
 Archisoft's new AMI (Amazon Machine Image) offers a turnkey (one-click) web server solution pre-configured and ready to deploy for DIY, small and medium size businesses. It is simple to deploy, yet configurable and also scalable via load balancers.
Perfect7 LAMP AMI comes in two variants.
1) Perfect7 LAMP v1.1 Multi-PHP Base (without security)
2) Perfect7 LAMP v1.1 Multi-PHP w/Security:
- Preconfigured with: Advanced Policy Firewall (APF), Brute Force Detection (BFD), (D)DoS Deflate (distributed denial-of-service attack mitigation) & Monit (server services monitor).
These are robust and highly available web servers, custom compiled with the latest open source technologies on a proven and stable enterprise class operating system (CentOS 7) with long term support, which is best suited for production environments. This AMI is a true one click solution. Once activated, follow the step by step instructions to setup your domain name, ftp, email user accounts with SPF & DKIM support.
This AMI is WordPress ready. See instructions below. To tighten security, it is possible to disable access to wp-admin & wp-login.php, while enabling access to specific IP's only. You can also install more than 1 copy of WordPress for development / testing, after which the new version can go live. See detailed step by step instructions below.
This AMI saves hundreds of hours of compilation and testing of various technologies. When you start using this AMI, you'll agree that it is named Perfect7 for reasons beyond the marriage of PHP7 & CentOS 7. Web server performance & stability can drastically vary, even if they are running the same technologies. However, when compiled based on benchmarking and compatibility testing, it produces a much higher level of server performance and stability. Test it for free (30 days trial) and you'll know that this AMI is production ready in all aspects.
Stay assured that this AMI was actually developed to host our own projects and projects of managed customers. We have made this available for public use via AWS marketplace for a minimal fee, starting at only $0.002/hr or $1.45/mth. Like AWS EC2 annual discount plans, annual subscribers will receive over 50% AMI discount to further reduce server cost.
Note: Detailed step by step instructions are provided covering even the basics like DNS setup to help DIY community.
WHM/cPanel Users: Users of WHM/cPanel should understand that Webmin/Virtualmin/Usermin control panel is as or more powerful platform. Webmin/Virtualmin has lots to offer, it is a more reliable and stable platform, especially it will not bloat or break your site with automated updates & features. Also Webmin/Virtualmin is far ahead in delivering today's technology rather than waiting months and years. Additionally, you can use this open source control panel for free as long as you want. If at anytime support is required, upgrade to pro version for added features and support (plans start at only $5/mth).
Important: Do not expect Webmin/Virtualmin to look and or work in the same way/manner as WHM/cPanel. These two control panels take completely different approaches. If you expect one to work like the other, then disappointment is unavoidable. It is easy to hate something that is not properly understood. Tip #1: Forget all that you know about other control panels such as WHM/cPanel and come with an open mind to learn something different, yet powerful. Tip #2: Be prepared to do some research ask questions at the Virtualmin forums to help with the learning curve before you could form an opinion about its capabilities. Tip #3: Understand that Webmin/Virtualmin takes a unix like approach, which sometimes require learning. But it is all worthy to break free from expensive, proprietary, outdated & at times not so reliable platform.
Our team has prepared step by step instructions to help with the transition and to get you started quickly!
Click here to see all Archisoft AMI's at AWS marketplace. Alternatively, you can also login to your account and find our AMI from AWS control panel as follows:
Signup for an AWS account from https://aws.amazon.com/ and login. Then click on "Services" from top left. Then click on EC2 & then click on "Launch Instance". Then click on "AWS Marketplace" from the left tabs. In the search box type "perfect7" to lookup for Perfect7 LEMP AMI's.
AWS Cloud instances are provided with non static (ephemeral) IP address, which changes without notice. However, a web server (or load balancer instance) requires a static IP address to map your domain name to your server.
After launching your AMI, click on "Elastic IPs" from the left menu under NETWORK & SECURITY. Then click on "Allocate New Address" button. Once allocated, select the IP and click on "Actions" button to select "Associate Address" and select the instance that you just launched using Perfect7 AMI and allocate IP address.
By default AWS restricts outgoing email from newly obtained IP's. For production, it is important to have these limitations removed. Click here to fill out the form to have this limitations removed by AWS. In Reverse DNS Record, enter your primary domain name like this: www.yourdomain.tld or yourdomain.tld (whichever way you intend to use your domain).
Note: Only after this limitation is removed (you will receive an email confirmation), you can test outgoing emails from your web server as described in the steps below.
DNS (Domain Name System/Server) is internet's domain name to IP address lookup system. When someone clicks on your domain name, the browser first tries to resolve the domain "name" to IP address via a DNS server. It is possible to register your own name servers from your domain control panel like this: ns1.yourdomain.tld & ns2.yourdomain.tld and then configure this from the Virtualmin control panel. However, it is a less reliable practise. It is best to use an external DNS server which is extremely available and fast.
We recommend Google Cloud DNS (low cost) or Amazon Route 53 (for advanced latency based load balancing). Our instructions are based on Google Cloud DNS, but the concepts are the same.
Once you create an account with Google Cloud DNS, login > Networking > Cloud DNS and click on "CREATE ZONE". Zone Name: Give it a name for your reference inside Cloud DNS interface. DNS Name: Enter your domain name like this: yourdomain.tld Click on "Create" button.
After creating your zone, the first step is to add your Static IP that you assigned Perfect7 AMI web server instance (AWS EC2 interface).
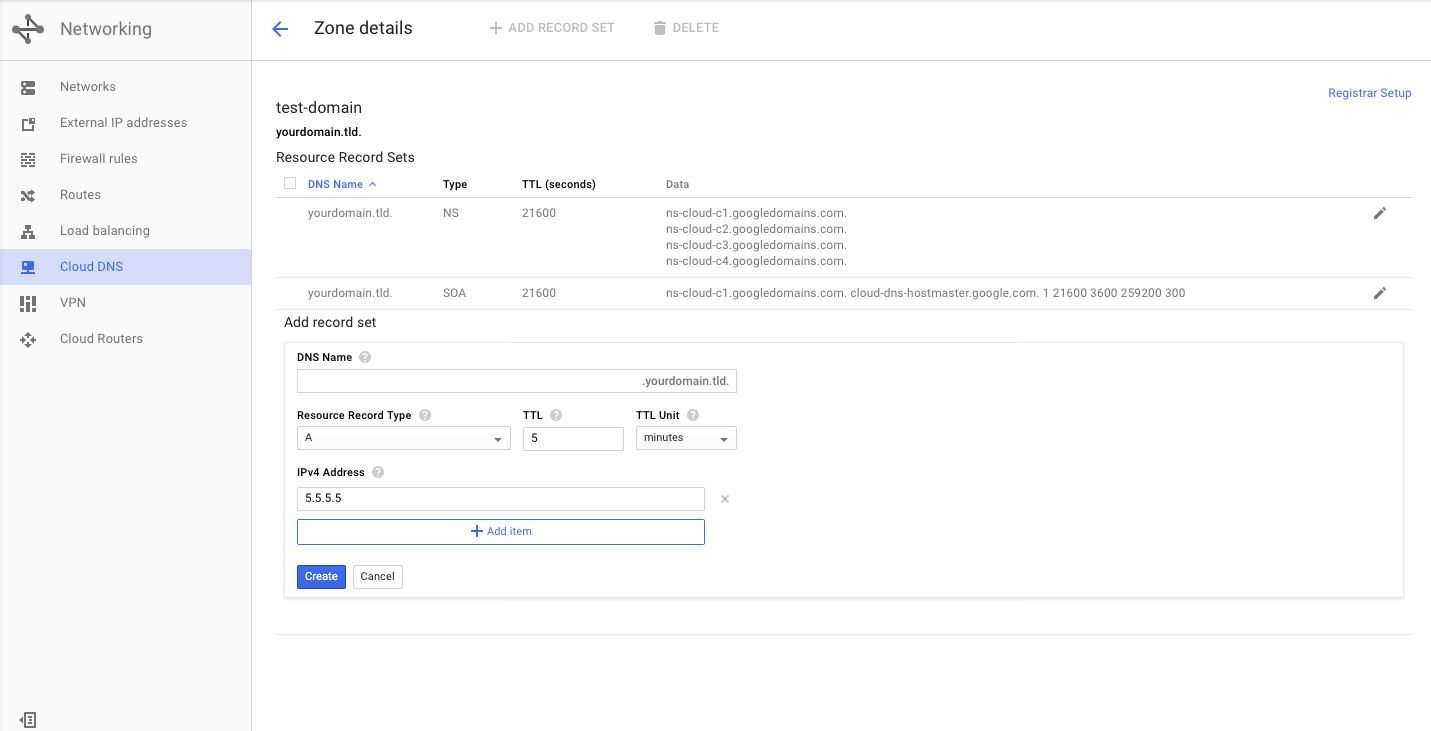
From Google Cloud DNS interface, create an "A" record for your server's IP address. Click on "+ ADD RECORD SET" from the DNS zone that you just created. From this interface paste your IP address into "IPv4 Address" field and click create button. No need to edit any other field (Resource Record Type: A | TTL 5).
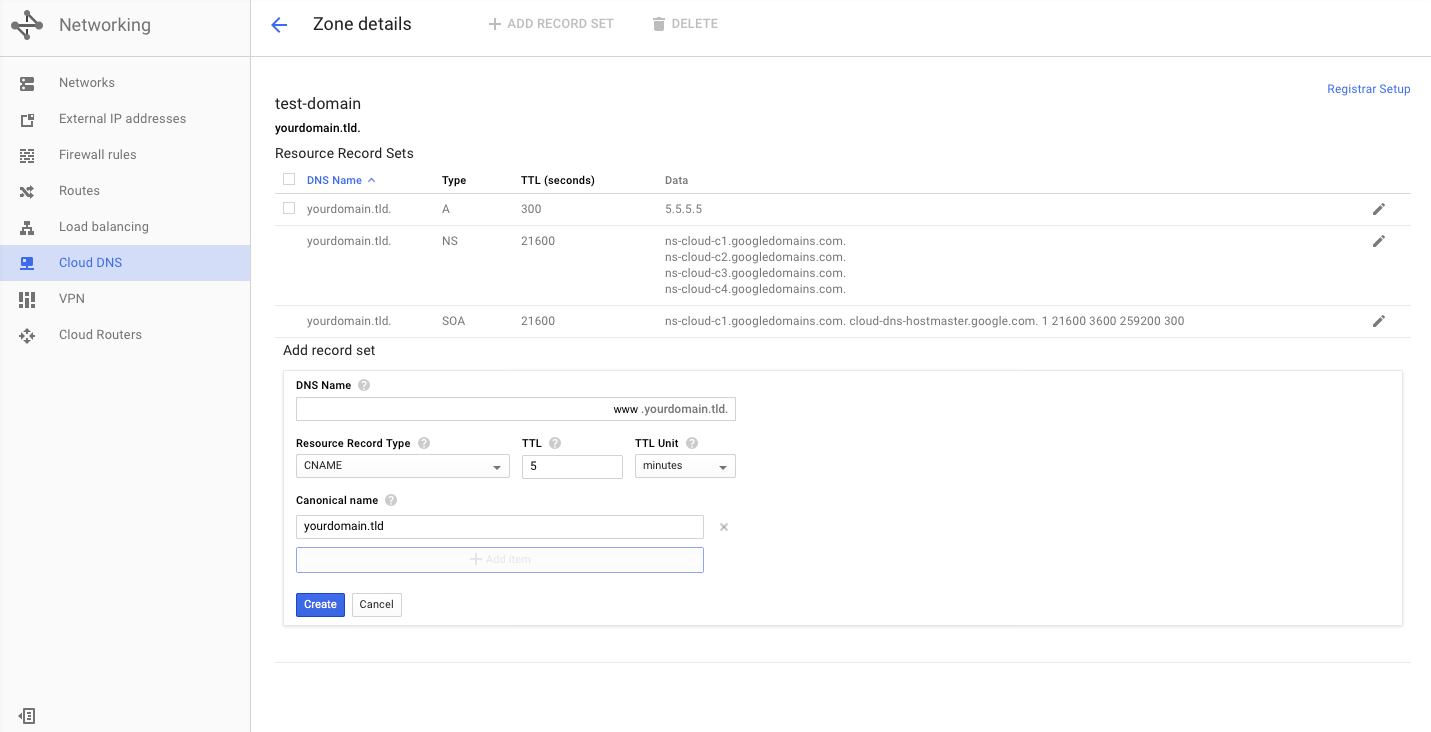
Create 5 more records with type "CNAME". First record: Click on "+ ADD RECORD SET". In "DNS Name" field, type "www". In "Resource Record Type" select CNAME. In "Canonical name" field, type yourdomain.tld. This CNAME record enables www.yourdomain.tld resolve to yourdomain.tld.
Repeat this step to create CNAME records for subdomains: "mail", "ftp", "host" & "ns". If you require to activate more subdomains, you can create more CNAME records. If your project require lots of subdomains, you can create a wildcard "A" record (use "*" for "DNS Name") and enter your static IP in the "IPv4 Address" field. This will forward all subdomain traffic to your server (note: if you use wildcard A record, still, above mentioned CNAME records are required).
Login to your domain registrar control panel (like: godaddy / masterdomainhosting.org). Go to your domain name settings and look for "Nameservers" and add all the nameservers one by one as provided by Google Cloud DNS for your domain name. Google DNS will look like this:
	# example Google Cloud Name Servers #
ns-cloud-c1.googledomains.com.
ns-cloud-c2.googledomains.com.
ns-cloud-c3.googledomains.com.
ns-cloud-c4.googledomains.com.
Note: After adding & saving nameserver information from the domain control panel, allow ample time (it can take few hours to few days) for your domain name to begin resolving to the IP address. Subsequent edits like changing IP address or creating new DNS records from Google Cloud DNS will resolve almost instantly, but it takes time during initial name server setup at the domain control panel.
Now its time to access your server via terminal and the browser. AWS Security Group acts as the primary firewall, therefore, appropriate "allow rules" must be defined in order to access your instance.
From Services > EC2 screen, click on "Security Groups" from the left menu. Select the security group to edit and then click on "Actions" button and select "Edit Inbound Rules" and add the following rules by clicking on "Add" button.
	Type: HTTP  | Protocol: TCP | Port Range:  80 | Source: Anywhere (0.0.0.0/0)

	Type: HTTPS | Protocol: TCP | Port Range: 443 | Source: Anywhere (0.0.0.0/0)

	Type: SMTP  | Protocol: TCP | Port Range:  25 | Source: Anywhere (0.0.0.0/0) >> to send & receive emails

	Type: All traffic | Protocol: All | Port Range: 0 - 65535 | Source: My IP (your ip)
From Services > EC2 Page, click on instances from the left menu, then select the Perfect7 instance, click on "Actions" button and then click on "Connect" for connections methods and instructions.
Once connected to your instance, follow the instructions below to be executed from the command prompt.
Webmin/Virtualmin Control Panel uses your root login credentials. The username is root, to create a password, use the following command.
$ sudo passwd root
New password:
Periodic system updates is recommended to upkeep with software security patches and versions. Run the following command to update your server software.
$ sudo yum -y update
Webmin/Virtualmin is pre-configured to daily update security patches. You can change this settings from Webmin/Virtualmin control panel from Webmin Tab > System > Software Package Updates (see below under "Scheduled checking options").
NOTE: Users of w/Security AMI have reported lockouts. If this happens disable APF from terminal using the command below. Also uninstalling and reinstalling APF has been found to resolve this issue.
$ sudo /usr/local/sbin/apf -f
Whitelist all IP's that will interact with your server. Failure to do so, might get you locked out. To obtain your IP address, visit this page: http://ipinfo.io/. Replace 1.2.3.4 with your IP address in the following commands. Repeat steps to add more IP's.
Advanced Policy Firewall (APF) is an iptables (netfilter) based firewall system. APF extends Linux firewall with additional features and easy interaction by you the server administrator as well as other applications such as (D)DoS Deflate & Brute Force Detection (BFD)
In APF there are allow & deny rules. As an web administrator you can manually set these rules. (D)DoS Deflate & BFD automatically sets deny rules based on your settings. It is highly recommended to set "allow" rules for all of your IP addresses (including EC2 elastic IP) so that you will not lock yourself accidentally.
To Create an Allow Rule, run the command below.
$ sudo /usr/local/sbin/apf -a 1.2.3.4
APF deny rules are created with option "-d" followed by the IP (instead of "-a" to allow). Option "-u" is used to remove an IP rule. To see all APF options, run this command sudo /usr/local/sbin/apf.
APF allow and deny files are located at cd /etc/apf/. Use "sudo su" command (super user) to browse this directory. Use "exit" command to get back to local user.
APF config file can be edited with this command: sudo nano /etc/apf/conf.apf. Note: APF is preconfigured with DShield & SPAMHAUS block rules.
With APF you can maintain a Global Allow & Deny ruleset. We recommend this, as you can allow or block traffic to IP's (or networks like 22.23.0.0/16) without having to use terminal commands. Every 10 minutes APF will automatically download and apply the Global rules.
To enable Global Trust, edit APF config file as follows: sudo nano /etc/apf/conf.apf
##
# Global Trust
##
# This is an implementation of the trust rules (allow/deny_hosts) but
# on a global perspective. You can define below remote addresses from
# which the glob_allow/deny.rules files should be downloaded from on
# a daily basis. The files can be maintained in a static fashion by
# leaving USE_RGT=0, ideal for a host serving the files.

USE_RGT="1"

GA_URL="yourdomain.tld/apf/global_allow.rules"
GA_URL_PROT="https"

GD_URL="yourdomain.tld/apf/global_deny.rules"
GD_URL_PROT="https"
BFD is a modular shell script for parsing application logs and checking for authentication failures. It does this using a rules system where application specific options are stored including regular expressions for each unique auth format. IP's that exceed login failures as defined in the config file are automatically blocked with APF deny command. (you will receive an email for each block incident)
BFD config file can be edited with this command: sudo nano /usr/local/bfd/conf.bfd.
Add your IP's (one per line) to ignore list by editing this file:
$ sudo nano /usr/local/bfd/ignore.hosts
CTRL + x to exit nano editor.
Use the following command to start BFD. Use option -a to list addresses that have attacked this host (BFD is configured to start automatically).
$ sudo /usr/local/sbin/bfd -s
(D)DoS Deflate is a lightweight bash shell script designed to assist in the process of blocking a denial of service attack. This script periodically runs this command "netstat -ntu | awk '{print $5}' | cut -d: -f1 | sort | uniq -c | sort -nr" to calculate and sort network connections. IP addresses with over a pre-configured number of connections are automatically blocked in the server's firewall, with an APF deny command. You will receive an emails for each block incident.
Since the launch of this AMI, we found some bugs in DDoS, therefore an upgrade is required. From SSH terminal, run the following command to upgrade DDoS to the latest version.
cd ~ && sudo wget http://www.archisoft.ca/ami/ddos-upgrade.sh && sudo chmod 0700 ddos-upgrade.sh && sudo ./ddos-upgrade.sh
Note: The script will prompt the following question: Autoinstall dependencies by 'yum'? (n to exit) type y and press return key to continue.
You can edit the config file with this command: sudo nano /etc/ddos/ddos.conf
"NO_OF_CONNECTIONS=150" this setting bans all IP's that exceed 150 simultaneous connections. Edit this to a lower or higher number as required by your specific application.
"BAN_PERIOD=600" this setting locks out an offending IP for 600 seconds (10 minutes). Adjust this number as required. To block a IP for 1 day, enter 86400 instead of 600. When you see the same IP's blocked frequently, it is recommended to add repeat offenders to APF global or local deny rules.
HOST_IP="0.0.0.0" Replace 0.0.0.0 with your EC2 static IP address. Note: If this instance will be assigned random IP address, leave this settings to its default value of 0.0.0.0
Edit Ignore List: Add all your IP's to ignore list to prevent accidental lockout. ALSO ADD EC2 INSTANCE ELASTIC IP. The file should contain 127.0.0.1. Recommended to add 169.254.169.254 (aws metadata ip). If you are using Google DNS - add their ip's as shown. Replace 1.2.3.4 with your IP.
$ sudo nano /etc/ddos/ignore.ip.list

127.0.0.1
169.254.169.254
8.8.8.8
8.8.4.4
1.2.3.4
CTRL + x to exit nano editor. Banned IP list is located at: sudo nano /var/lib/ddos/bans.list
Restart DDoS for settings to take effect: sudo /etc/init.d/ddos restart
Monit has been preconfigured to monitor most vital services in your web server. If a server service should go down, Monit will automatically try to restart it (you will receive email notification for each such incident).
You can edit Monit config file with the following command. Add your domain to the mail-format & uncomment the 5th line, as shown:
$ sudo nano /etc/monit.d/monitrc

set mail-format { from: monit@yourdomain.tld }
CTRL + x to exit nano editor. Run the following command to restart Monit service.
$ sudo systemctl restart monit
Additionally use this command to reload all commands in Monit: sudo monit reload. To start all services use sudo monit start all command.
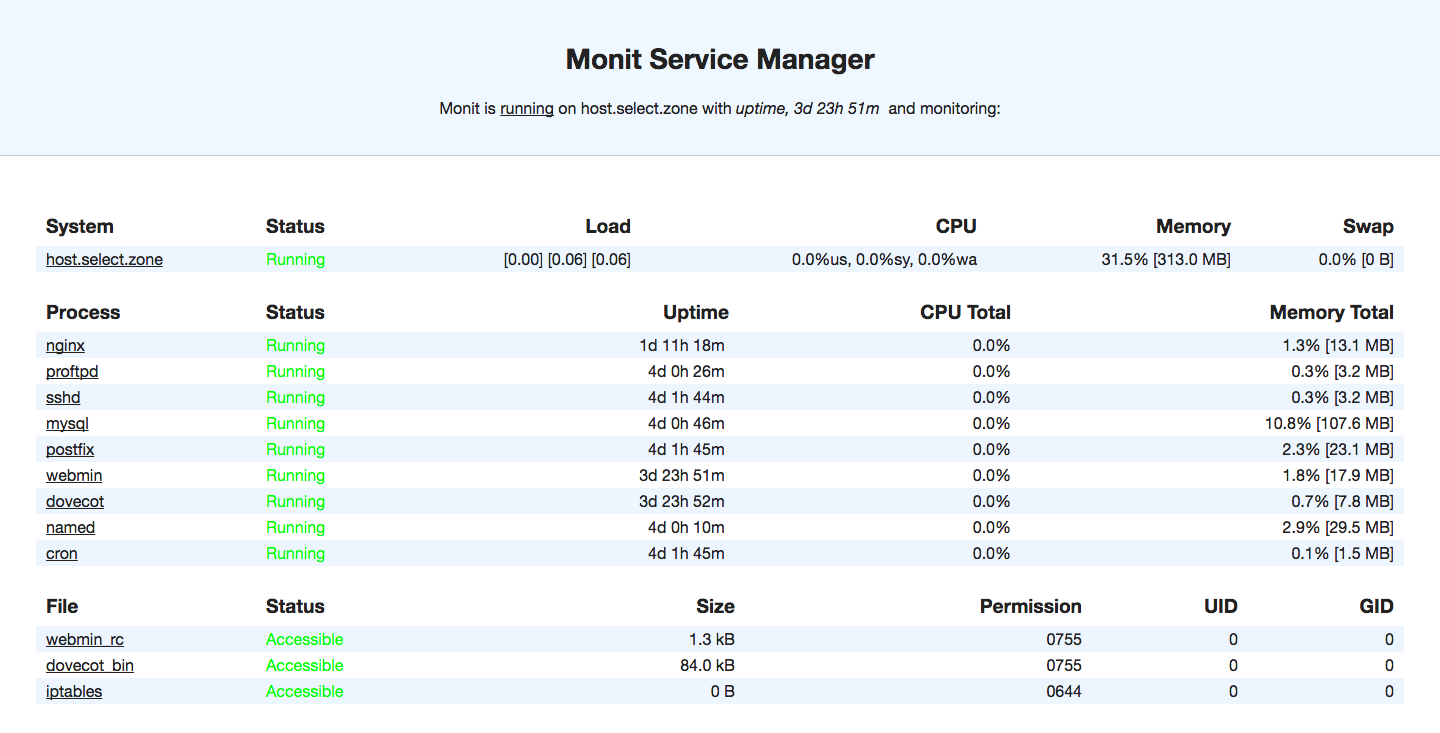
By default Monit webserver is pre-configured to run in port 2812 (see Monit control panel at: http://your-ip-or-domain.tld:2812). Default username: admin password: monit.
Monit Server configuration file is located at: sudo nano /etc/monitrc
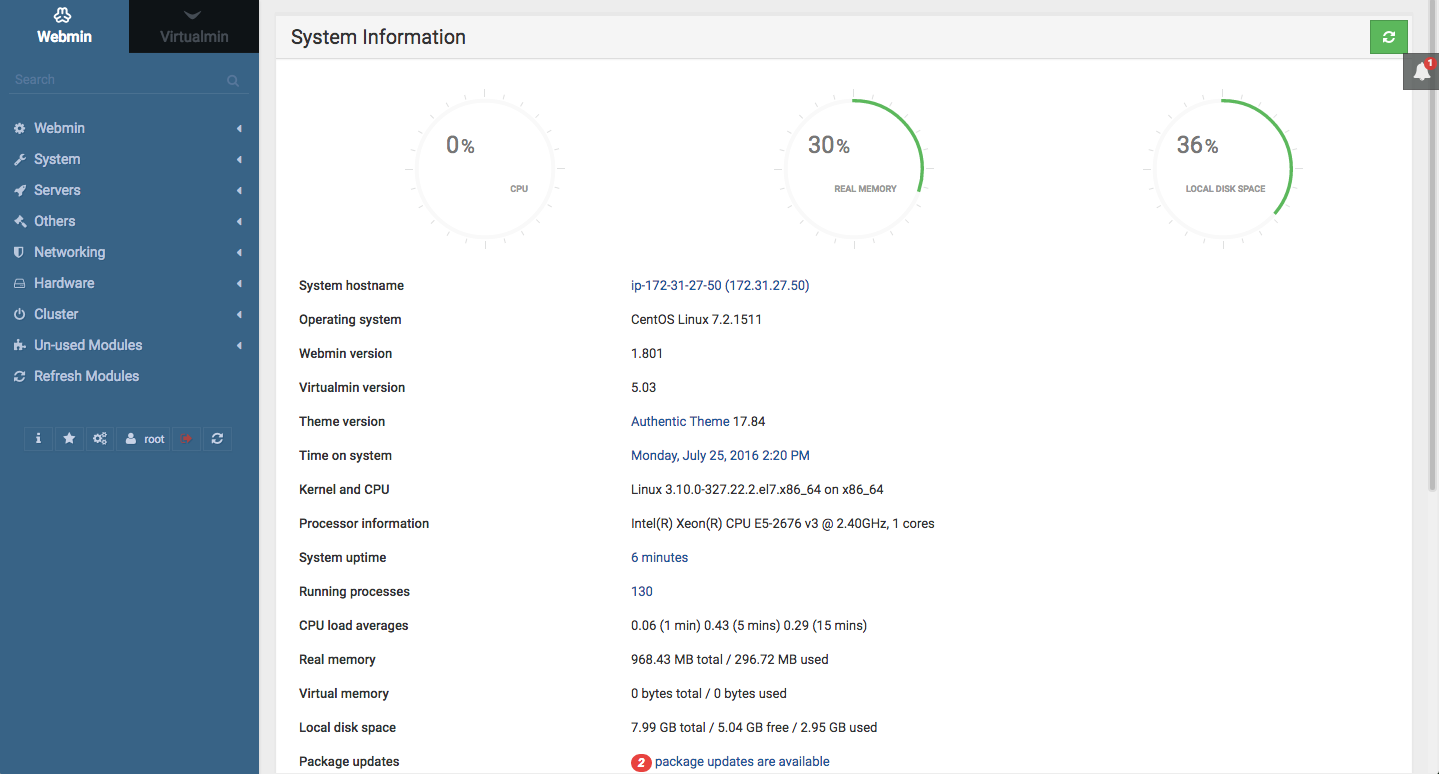
You can access your Webmin/Virtualmin Control Panel via the static IP that you assigned in the first step. For this example, lets assume 5.5.5.5 as your instance IP. To login to your Webmin/Virtualmin Control Panel use the following url pattern: https://5.5.5.5:10000/ Make sure that the protocol is "https" and the port is 10000 (ten thousand). Use root for username and the password that was setup earlier.
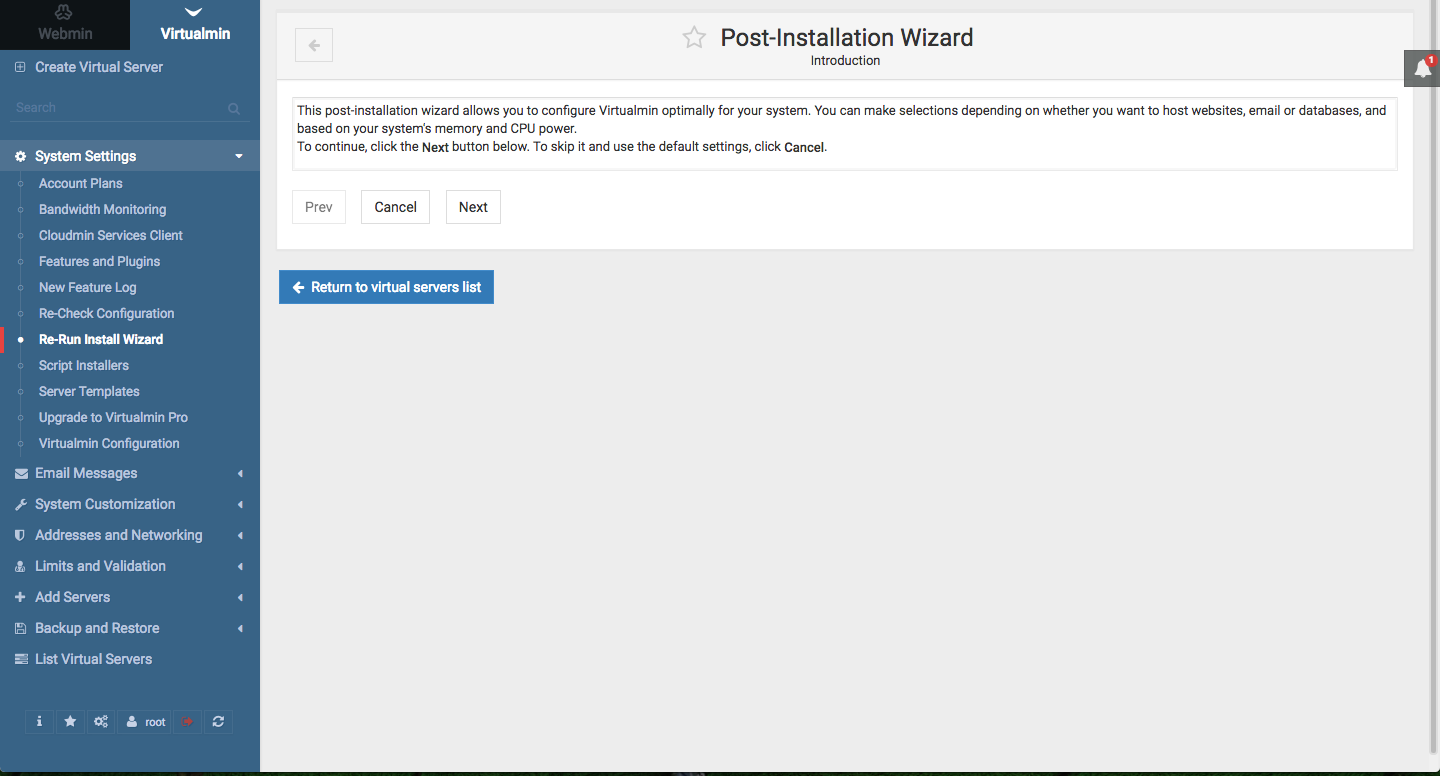
Click on Virtualmin Tab > System Settings > Re-Run Install Wizard. This will walk you through the basic options. You can come back to this and change any of these options at anytime.
During this setup, you can create MySQL password by selecting "Yes" to this question "Run MySQL database server?" (required to follow other steps below).
In "Primary nameserver" field enter a name server like this: ns.yourdomain.tld (as setup in DNS CNAME record above).
Note: It is recommended to leave Preload Virtualmin libraries? to "Yes (more RAM used, faster Virtualmin UI - approximately 40M)"
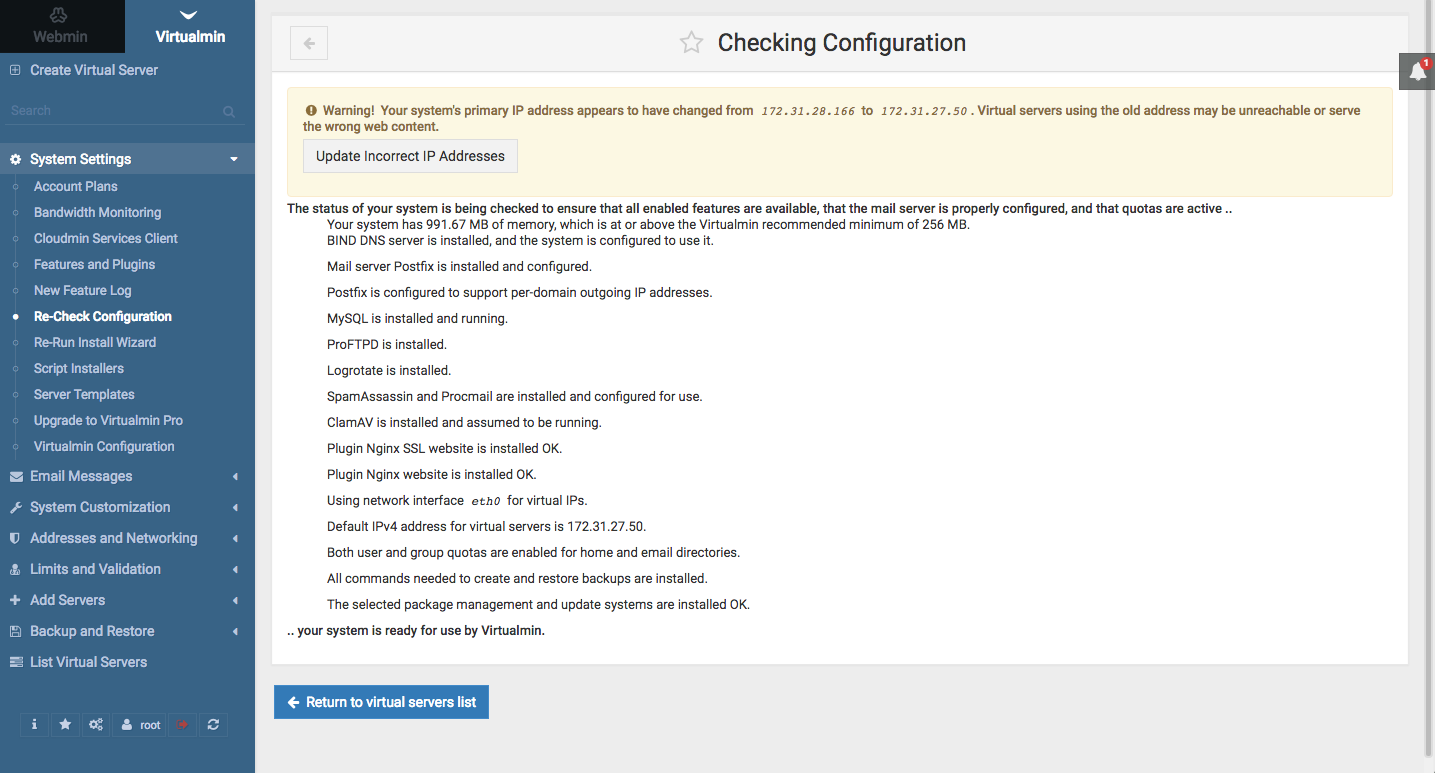
Virtualmin Tab > System Settings > Re-Check Configuration. You should not see any errors in the result page except "Update Incorrect IP Addresses" message. Now, click on "Update Incorrect IP Addresses" button and then click on "Change Now" button on the next page.
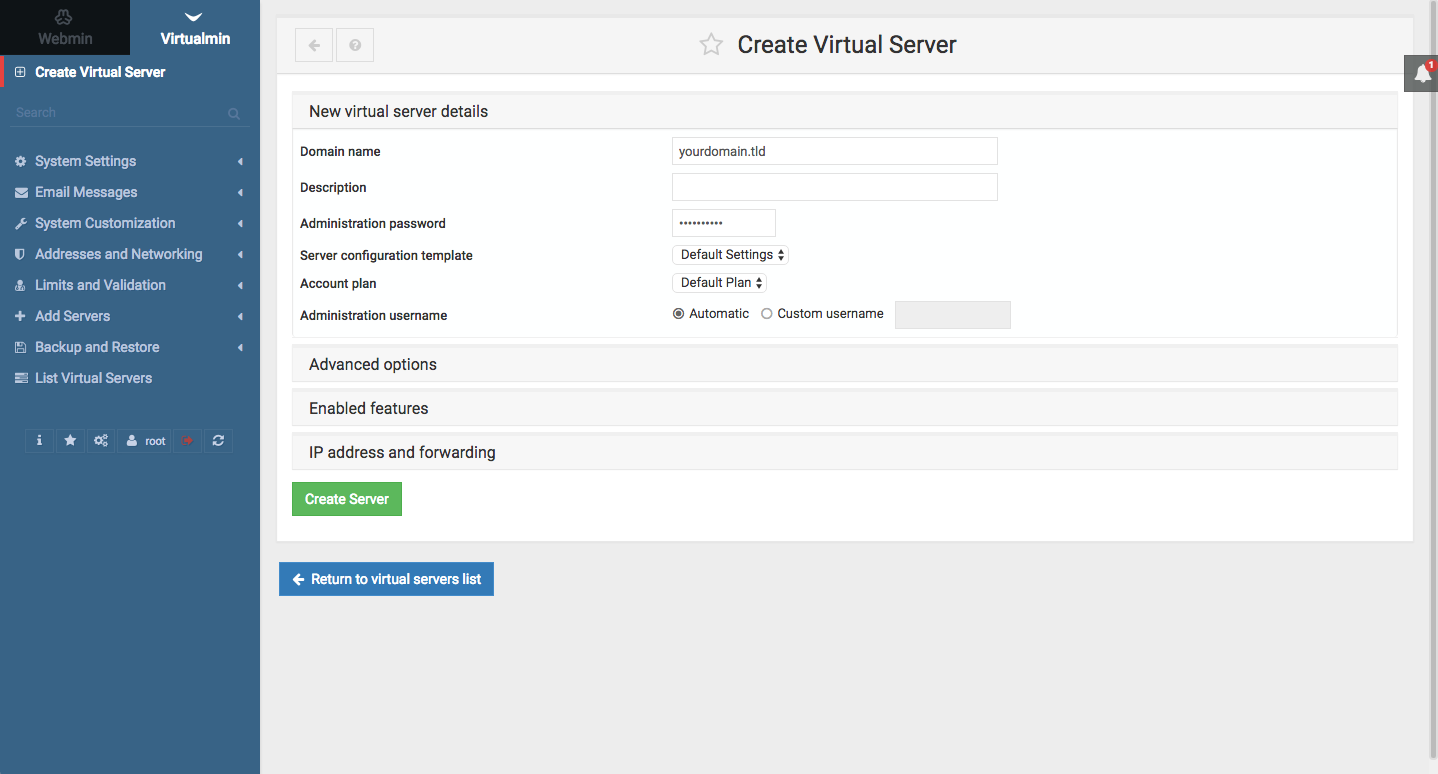
Now you can create the first site in your shiny new server!
From Virtualmin tab click on the very first option "Create Virtual Server" (Virtualmin Tab > Create Virtual Server) and enter your domain name and a password and then click on "Create Server" button.
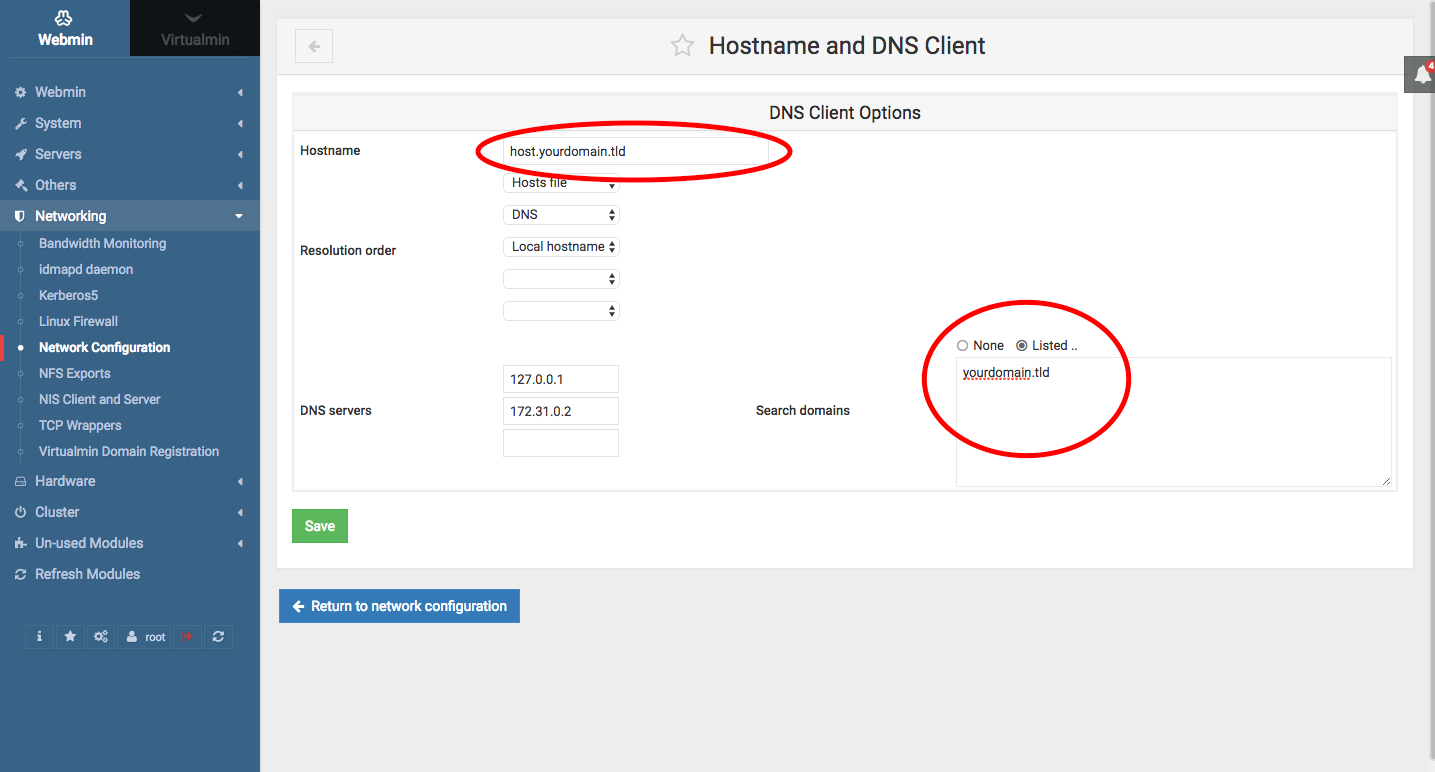
Go to Webmin Tab > Networking > Network Configuration > Hostname and DNS Client
Edit Hostname: host.yourdomain.tld
Search domains: yourdomain.tld (refer screen shot)
Click on "Save" button
Click on "Apply Configuration"
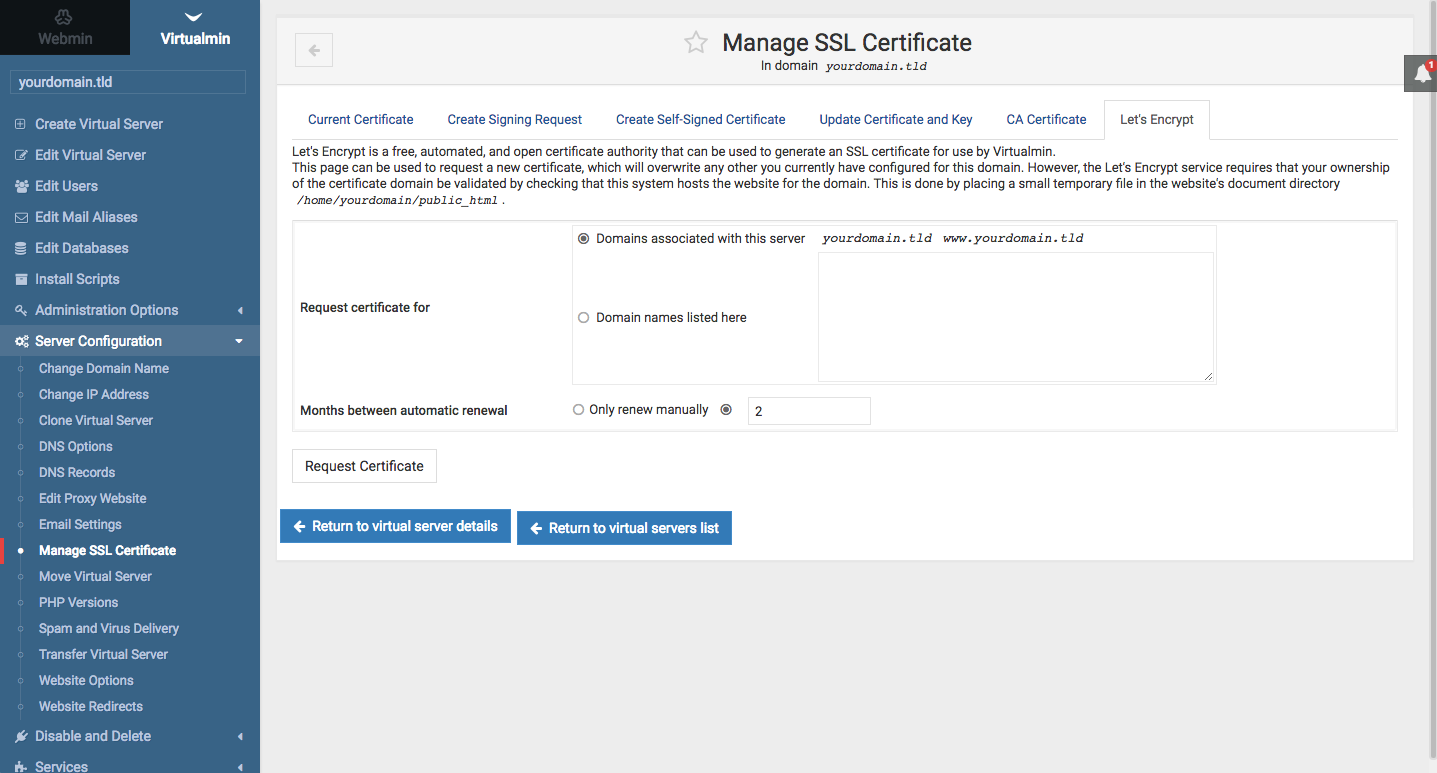
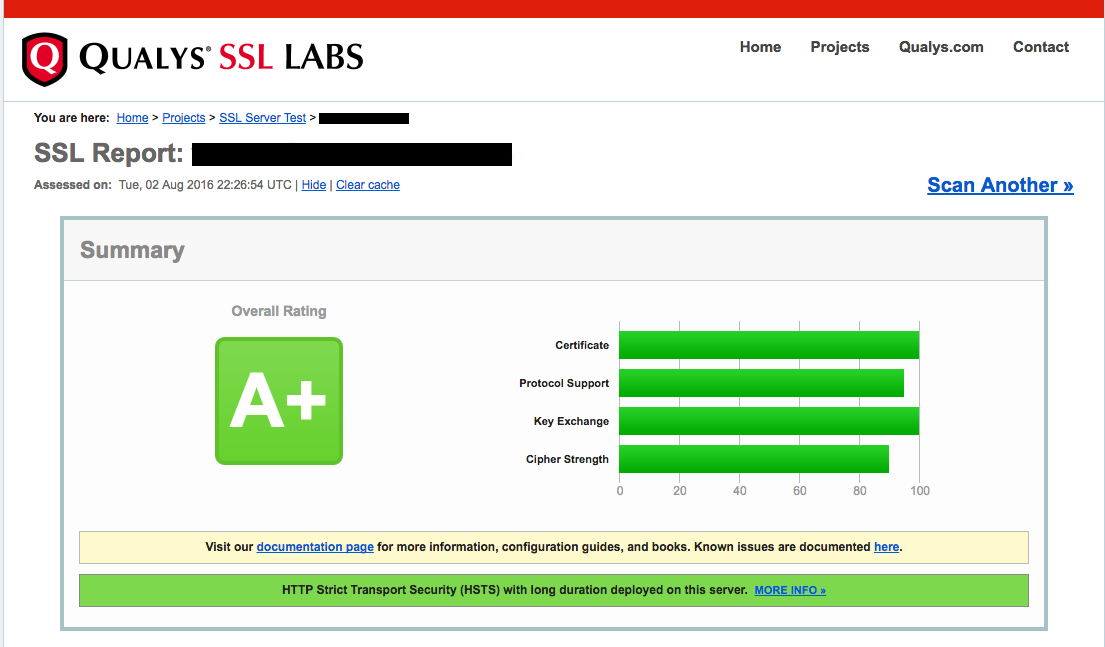
No more paying or renewing SSL certificates. Now its free and automated!
Click on Virtualmin Tab > yourdomain.tld > Server Configuration > Manage SSL Certificate > click on Let's Encrypt Tab. You can add more subdomains or other domains into the "Request certificate for" field. However, if those domains are not setup properly, Let's Encrypt authentication will fail altogether. For this initial setup it is recommended to leave this field blank and keep the default option: "Domains associated with this server"
Important: "Months between automatic renewal" option must be changed from "Only renew manually" to the next option and enter 2 in the field. See screenshot for reference.
Note: Your domain name must resolve to AWS Static IP before requesting SSL certificate form Let's Encrypt. Test from your browser by typing your domain name to make sure that it is reaching your Amazon Server.
Now click on "Request Certificate". If successful, you will see a message like this:
Requesting a certificate for yourdomain.tld, www.yourdomain.tld from Let's Encrypt ..
.. request was successful!
Configuring webserver to use new certificate and key ..
.. done

Applying configuration ..
.. done
If this process should fail, make sure that your domain name is properly resolving to your server IP address. In the steps above, you created a DNS record for your domain with Google Cloud DNS (or similar DNS service). After this step, you updated the nameserver information at your domain registrar's control panel. It can take several hours to couple of days for the new settings to take effect. To test if your domain is resolving to your AWS AMI's Static IP, open a browser and type: yourdomain.tld and you should see a 403 page like this: "Forbidden You don't have permission to access / on this server.". You should also be able to access this page directly by typing the Static IP address instead of your domain name. Another way to test domain to ip resolution is from terminal / command prompt > type "ping yourdomain.tld" and enter; the result should show your AMI's Static IP address.
If your domain resolves to your new server and still Let's Encrypt fails, it is possible for Let's Encrypt system to have some temporary issues. It is not advisable to try more than 2-3 times, as your IP might get banned. Just skip this step & use self signed SSL for now and try again in a day or two.
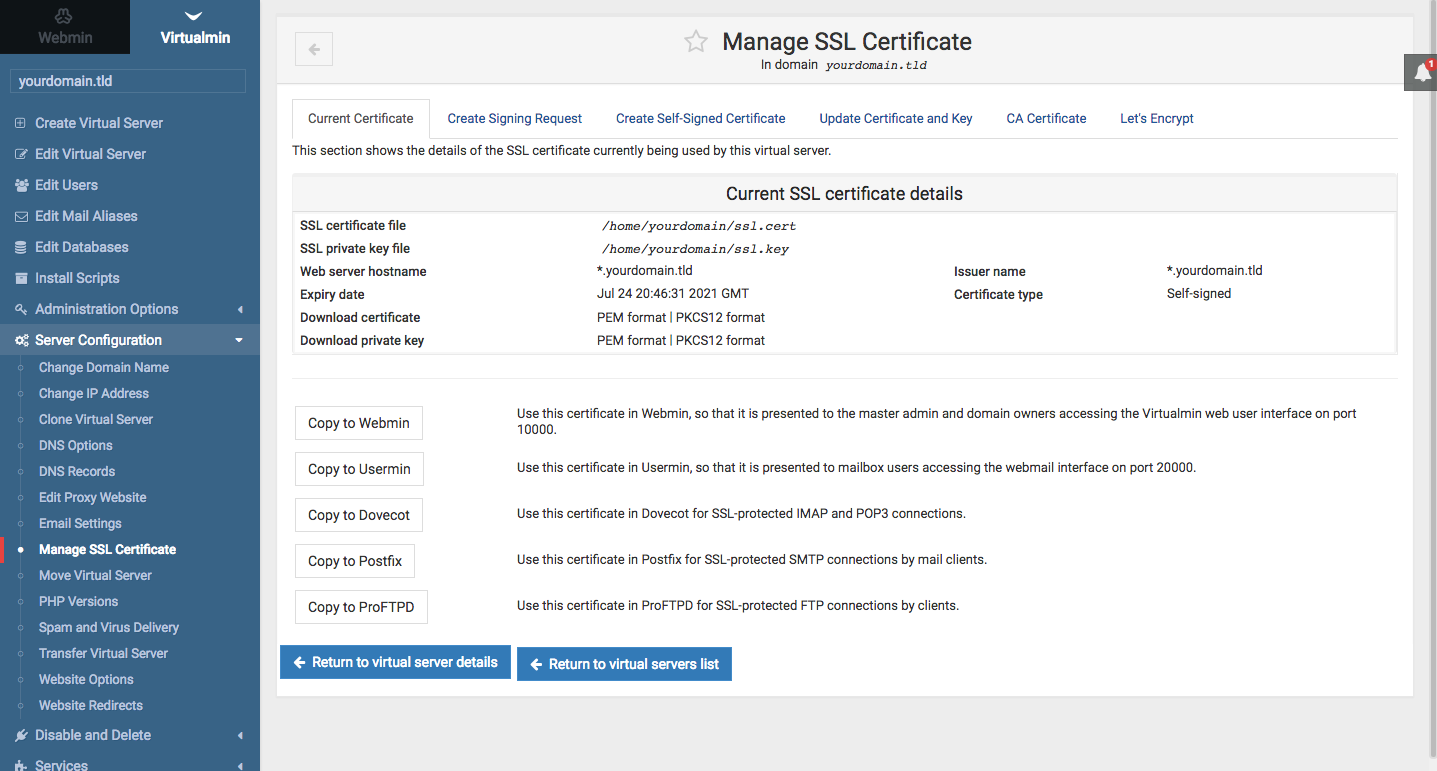
From the same mange SSL interface: Virtualmin Tab > yourdomain.tld > Server Configuration > Manage SSL Certificate > click on each of the buttons such as: "Copy to Webmin", "Copy to ProFTPD" etc... to use this auto renewing SSL certificate and also enable TLS/SSL encryption to server services such as ProFTP etc.
Note: After clicking on "Copy to Webmin", the control panel interface may become unresponsive. This is normal because the SSL certificate that your browser is connected is replaced with a new one. Just log back again via the same url (example: https://5.5.5.5:10000/) to continue with other buttons or click on "Copy to Webmin" button last.
Generate a strong Diffie-Hellman group as an additional layer of security & provide Perfect Forward Secrecy with ephemeral form of the Diffie-Hellman key exchange. Login to your server via SSH and run this commands. Note: this step will take a while to complete.
$ sudo openssl dhparam -out /etc/ssl/certs/dhparam.pem 4096
A perfect email system is an absolute necessity, whether, receiving a server notification from root or an important email to be delivered (from a PHP shopping cart script) to your customer. Perfect7 AMI allows you to configure the most perfect email server configuration for your business. When the step by step instructions are followed to set up SPF, DKIM and DMARC (Domain-based Message Authentication, Reporting & Conformance) all your outgoing emails will be encrypted & authenticated for successful email delivery to inbox. Also your domain name cannot be used by spammers to send emails from their servers. When DMARC is set to reject, email servers (like gmail) will reject all emails that do not pass SPF & DKIM. In other words, only your server is authorized to send emails from @yourdomain.tld email address. Spoofed emails sent from another IP address or domain will be discarded (rejected), and will not even reach junk / spam folders.
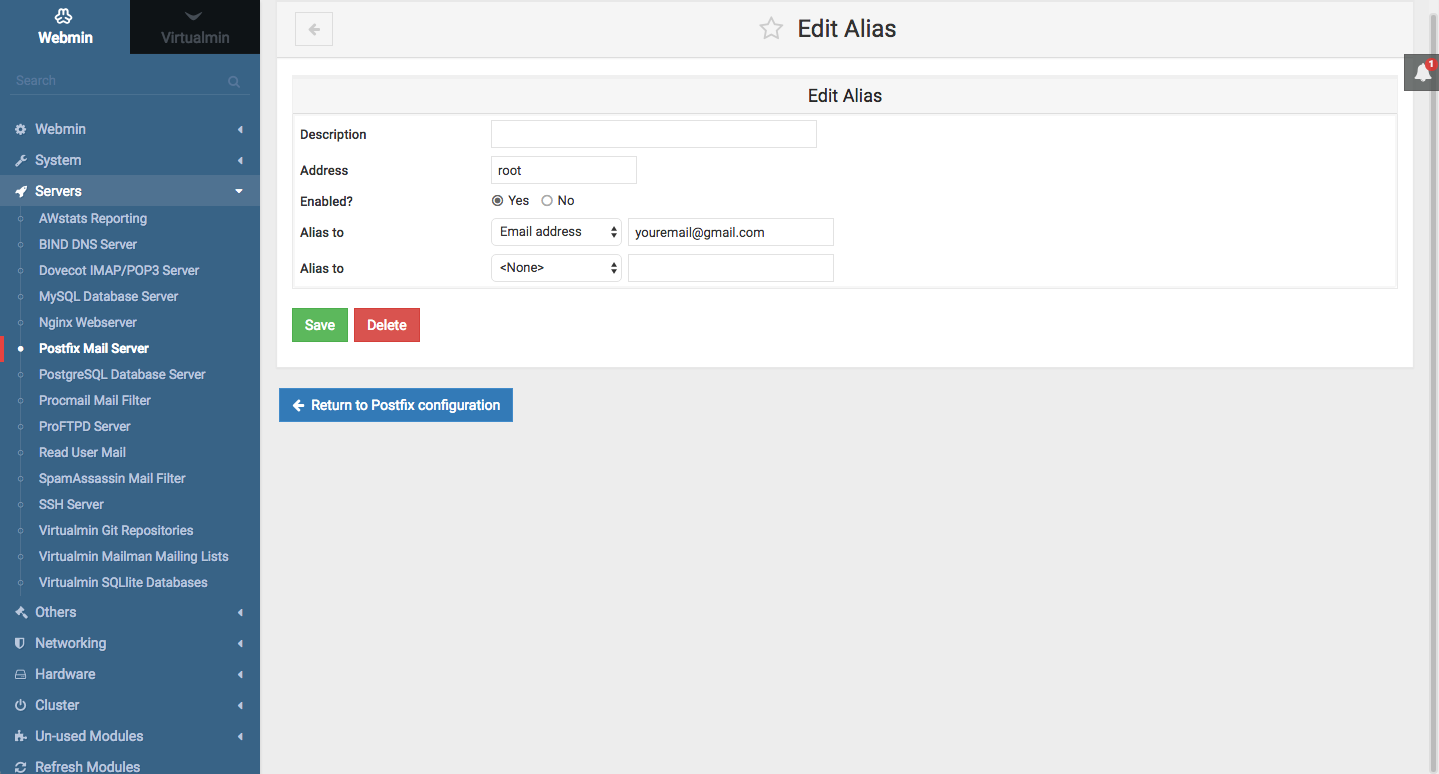
Most "system critical" alerts and notifications are emailed to the user "root". In this step, let's get root emails routed to your favourite email address such as "yourname@gmail.com"
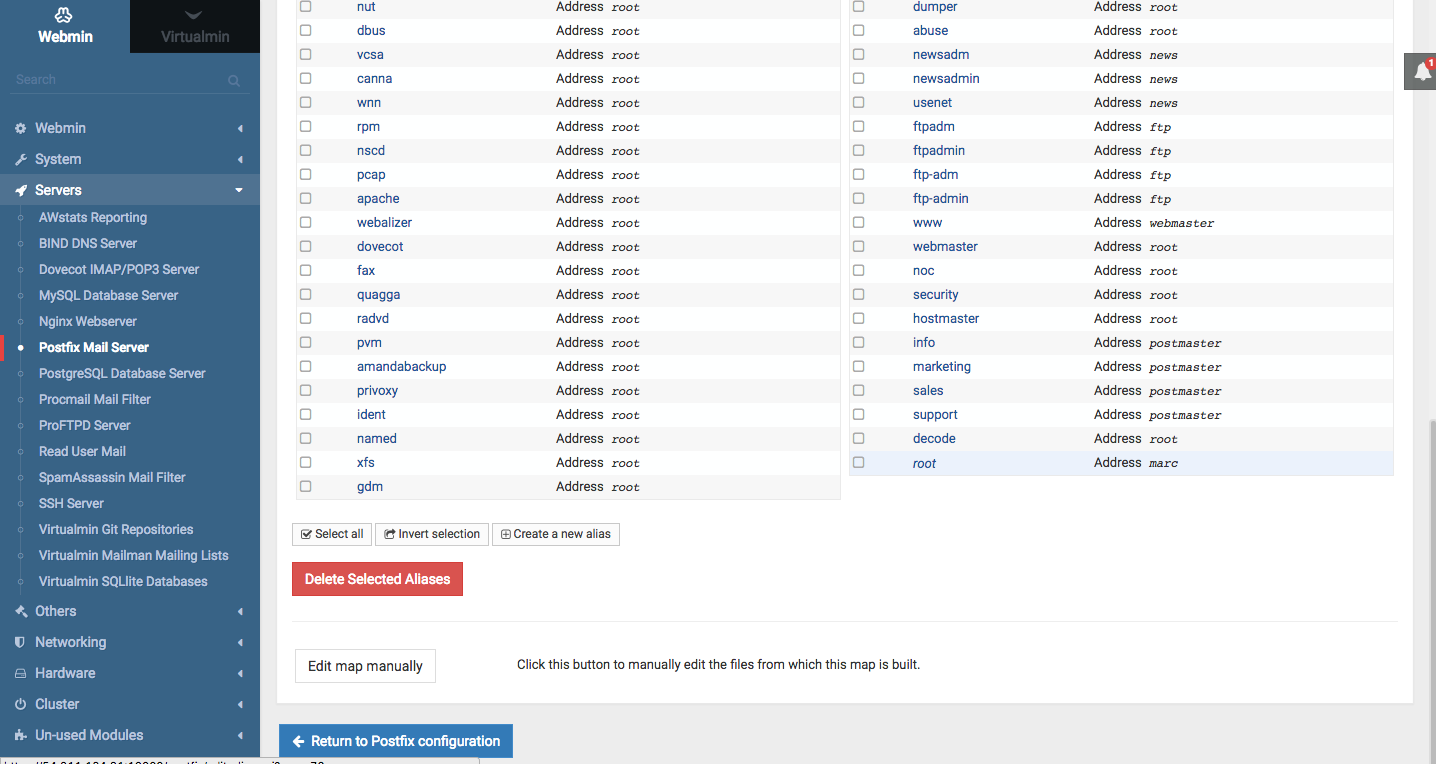
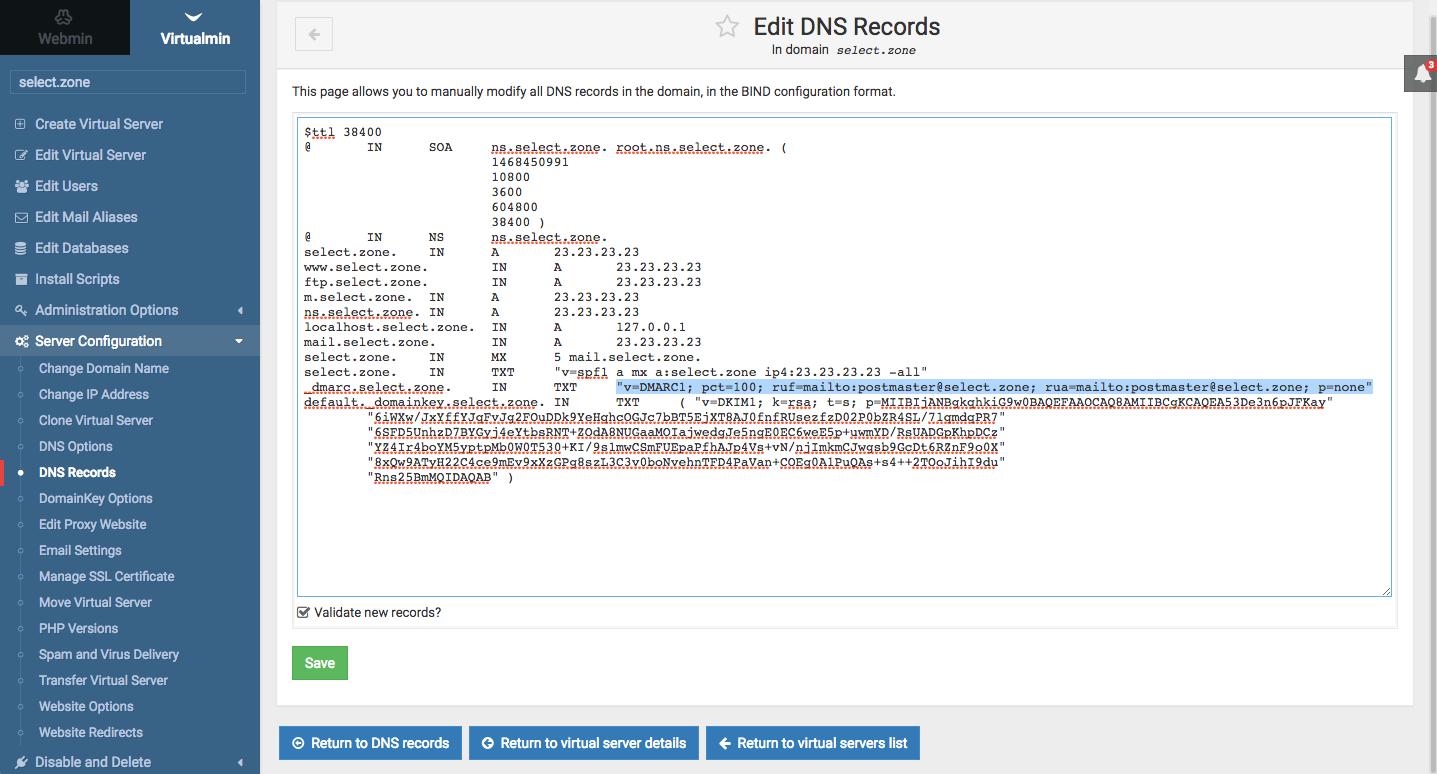
go to Webmin Tab > Servers > Postfix Mail Server > Mail Aliases > click on root (last item in the page) > Enabled?: "Yes" & Alias to: yourname@gmail.com (see third screenshot below). Click on "Save" button to complete/
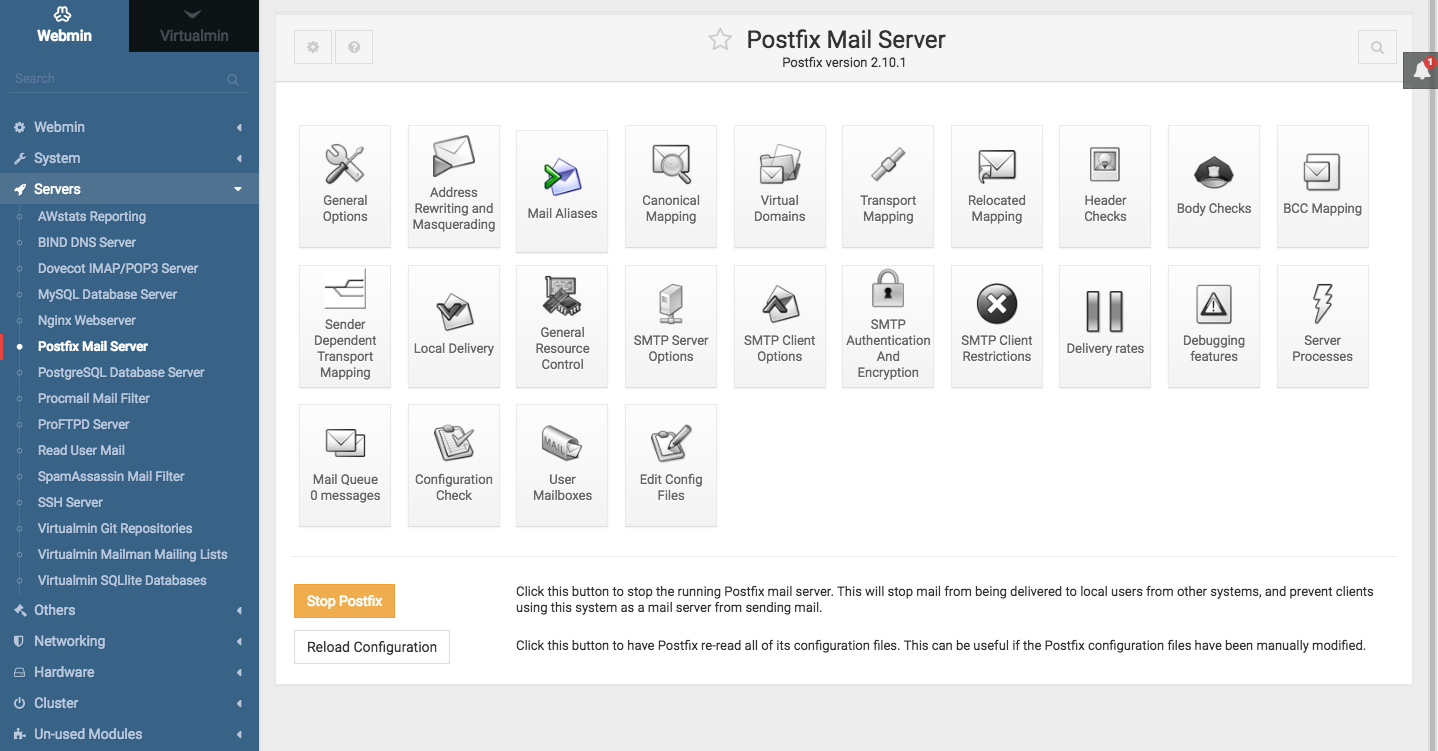
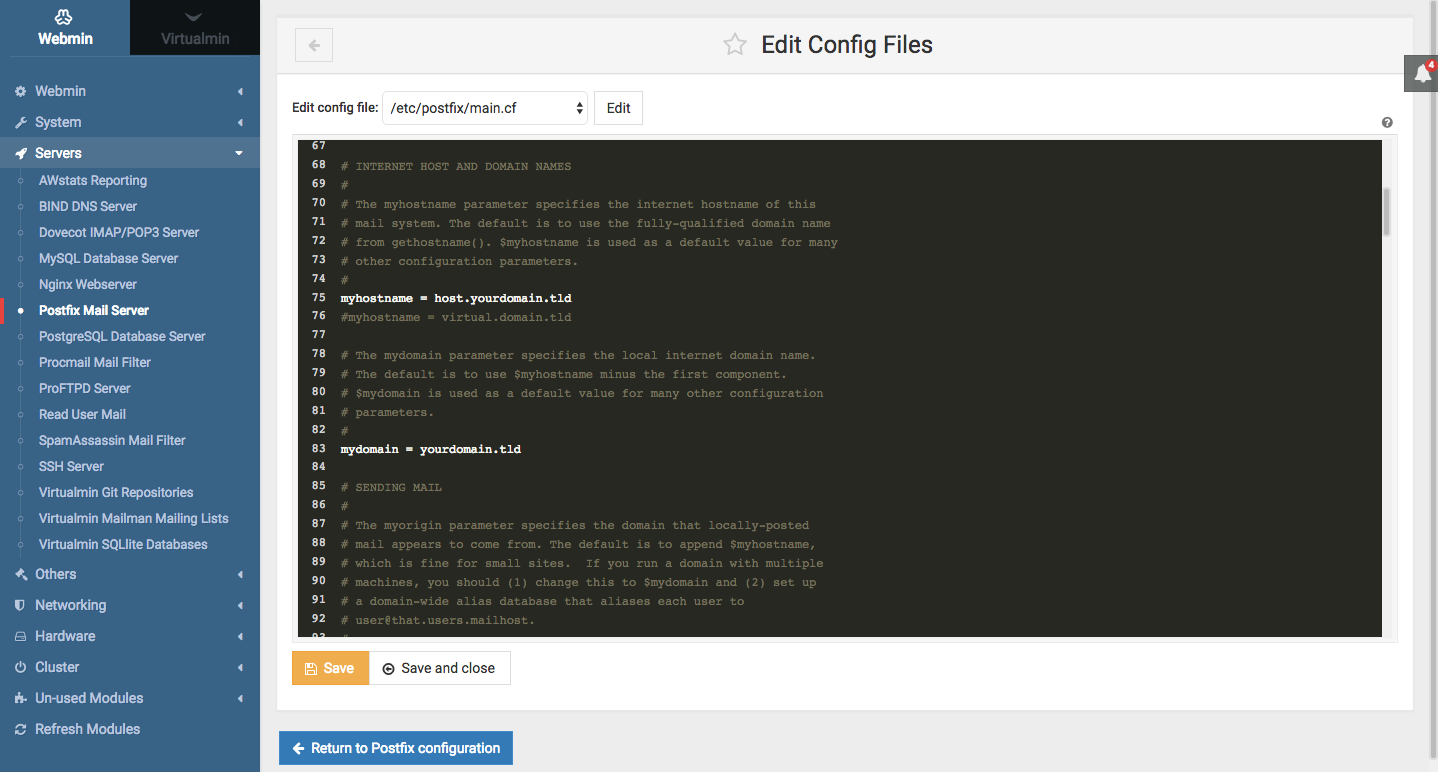
Webmin Tab > Servers > Postfix Mail Server > Edit Config Files > Scroll to
Line 75: Uncomment & Edit this line like this: myhostname = host.yourdomain.tld
Line 83: Uncomment & Edit this line like this: mydomain = yourdomain.tld (refer screen shot)
After editing, click on "Save and Close" button and then click on "Reload Configuration" button in the next page (bottom left) to restart Postfix Server.
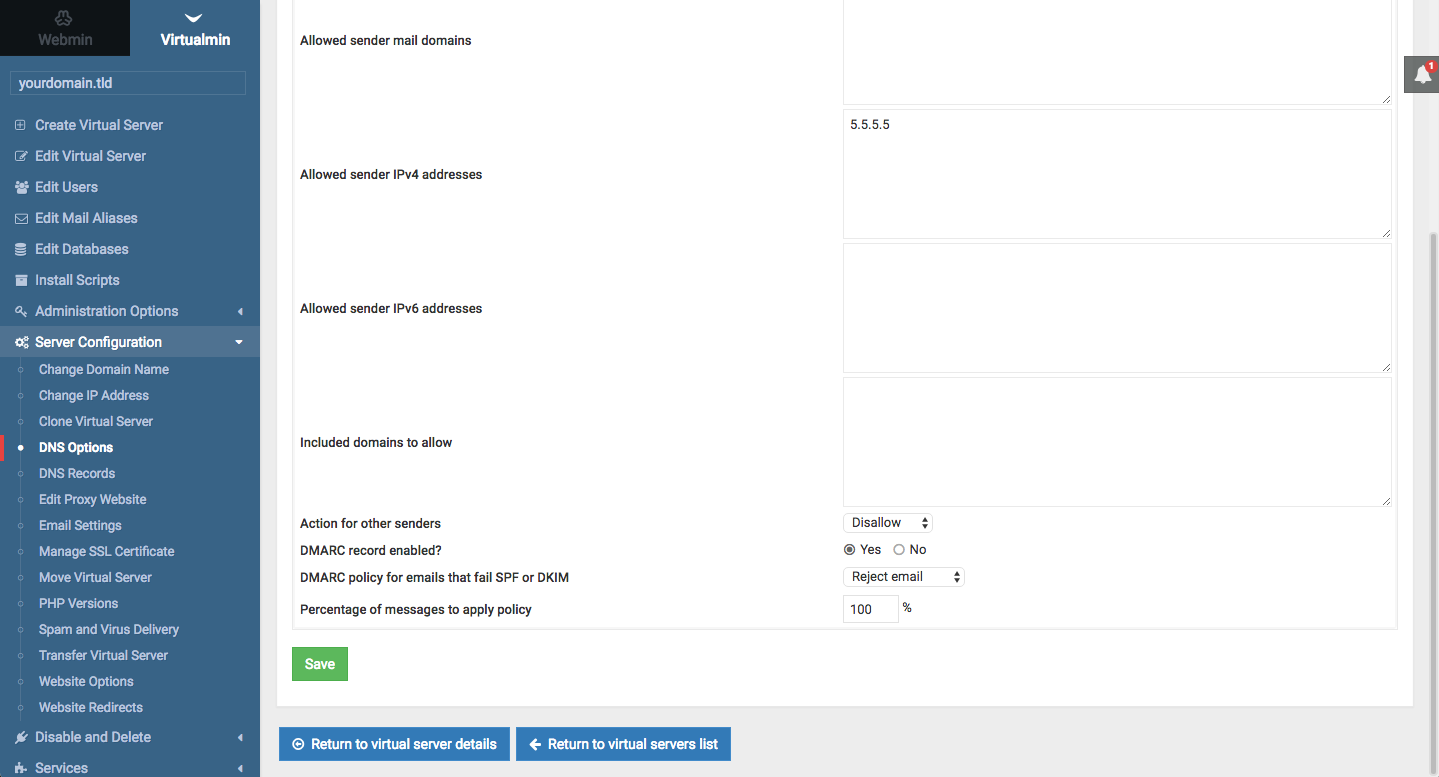
Virtualmin Tab > yourdomain.tld > Server Configuration > DNS Options:
SPF record enabled?: "Yes"
Allowed sender mail domains: yourdomain.tld & host.yourdomain.tld
Allowed sender IPv4 addresses: enter your Static IP address
Action for other senders: "Disallow" (or according to your preference)
DMARC record enabled?: "Yes"
DMARC policy for emails that fail SPF or DKIM: "Reject email" (best option for productions server. Select "Take no action" for testing, if emails are not being delivered)
Percentage of messages to apply policy: "100%" (or according to your preference)
Click on "Save" button
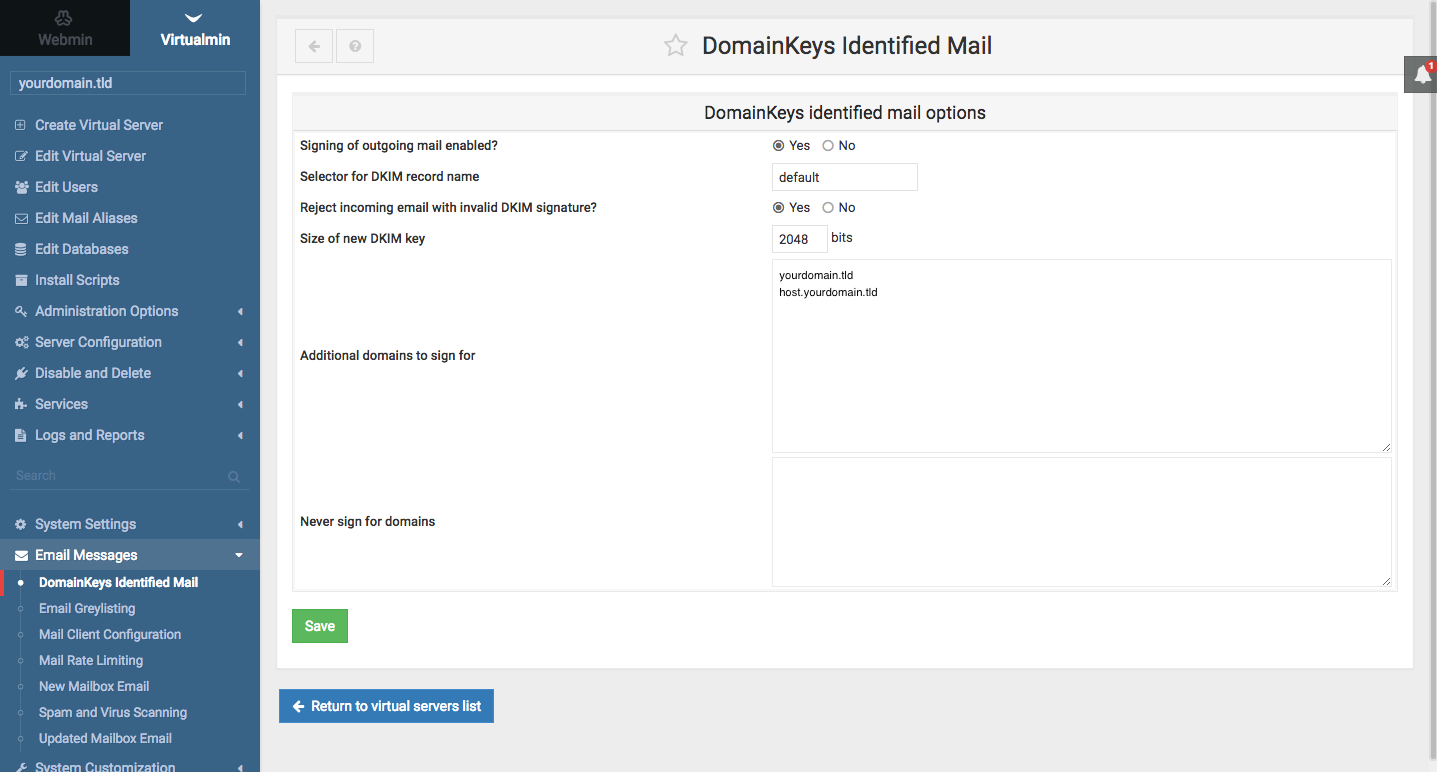
Virtualmin Tab > Email Messages > DomainKeys Identified Mail:
Signing of outgoing mail enabled?: "Yes"
Force generation of new private key?: "Yes"
Additional domains to sign for: "yourdomain.tld" & "host.yourdomain.tld" (one domain per line)
Click on "Save" button
For speed, availability and performance, we recommend the use of external DNS servers instead of the inbuilt DNS server. Therefore, after setting up SPF, DMARC & DKIM, all of the resulting DNS records must be copied over to the external DNS server.
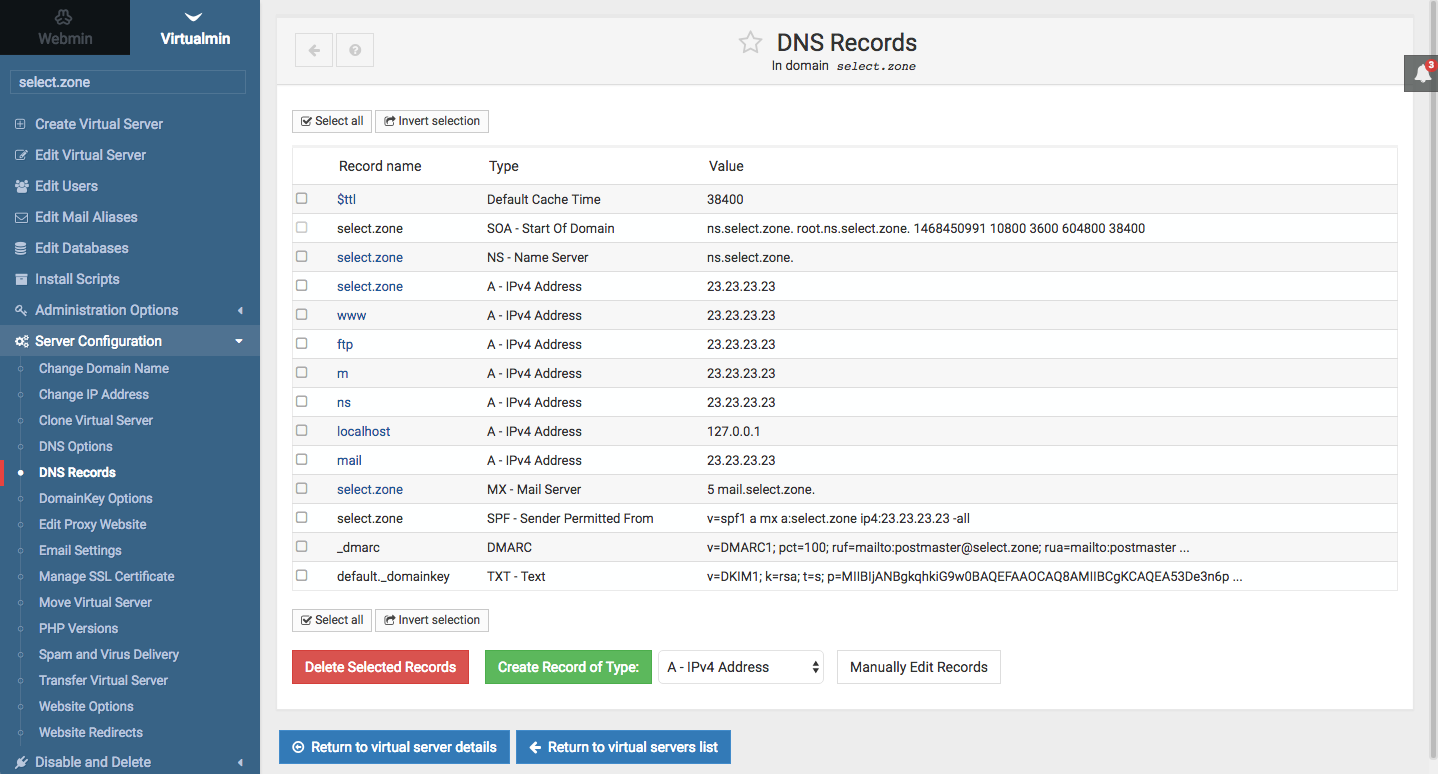
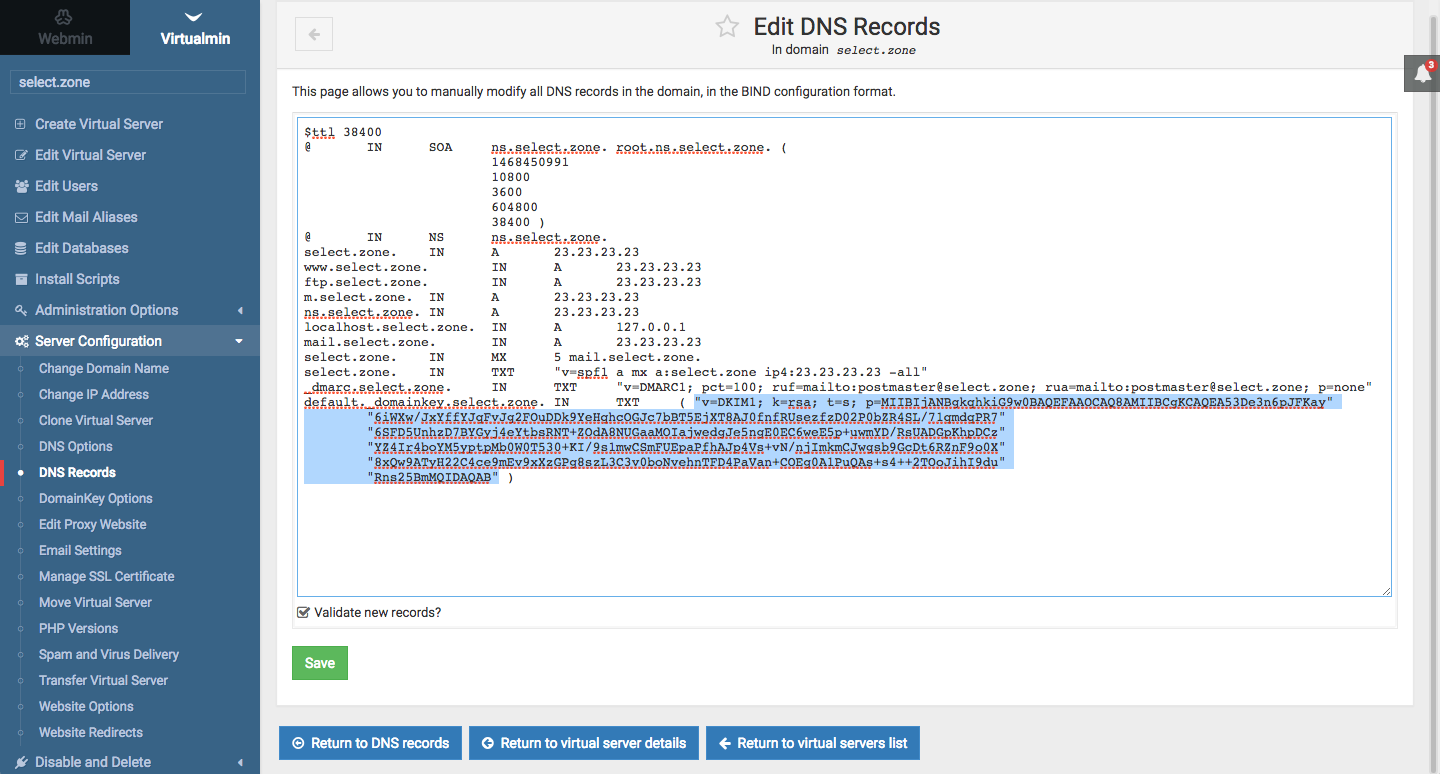
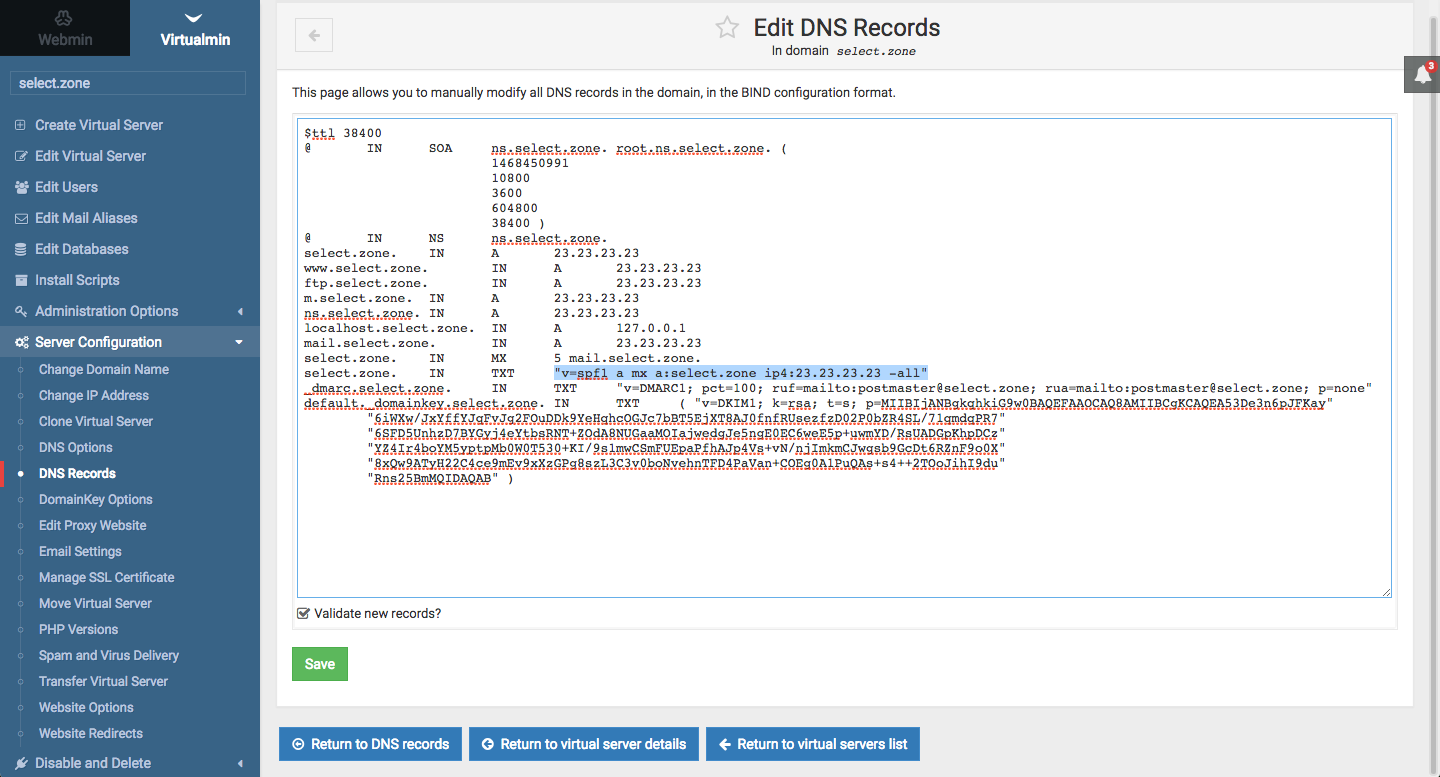
Let's take a look at your current DNS records. Go to Virtualmin Tab > yourdomain.tld > Server Configuration > DNS Records: Your screen should closely match the screen shot from one of our production server for domain "select.zone" with IP "23.23.23.23".
Now click on "Manually Edit Records" to view the entire records. The last 4 records are MX, SPF, DMARC & DKIM (domainkey), these DNS records must be recreated at your external DNS provider such as Google Cloud DNS.
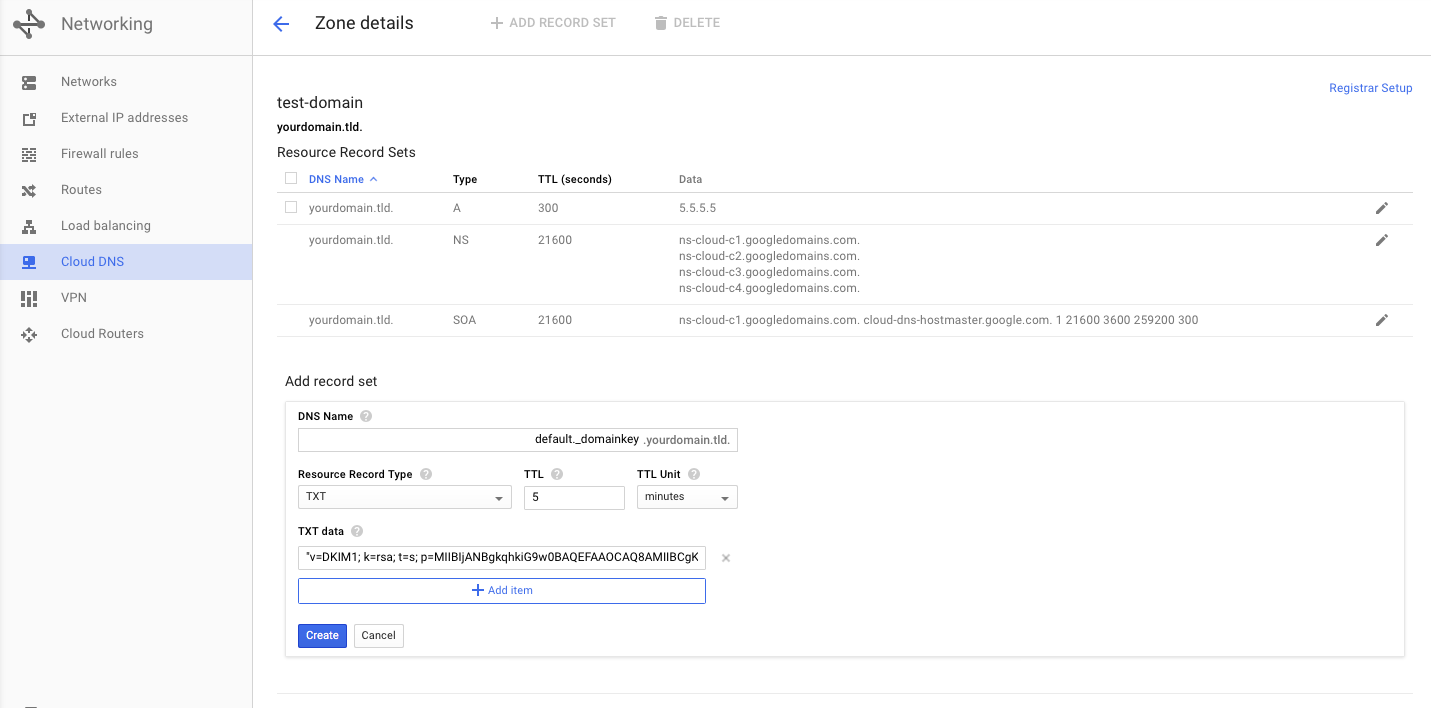
Let's now copy DKIM record to Google Cloud DNS. From Google Cloud DNS, click on "+ ADD RECORD SET"; In the "DNS Name" field enter: default._domainkey "Resource Record Type" select "TXT". In the "TXT data" field, copy and paste DKIM records from your Virtualmin DNS Records screen. Take special care to copy the data block as shown in the screen shot including the quotes but excluding the brackets. After pasting, click on "Create" button.
Repeat this step to create DKIM record for host.yourdomain.tld. In the "DNS Name" field enter: default._domainkey.host. This step will ensure root emails from your server will be signed.
Let's now repeat the same procedure to setup a TXT record for DMARC. In the "DNS Name" field enter: _dmarc
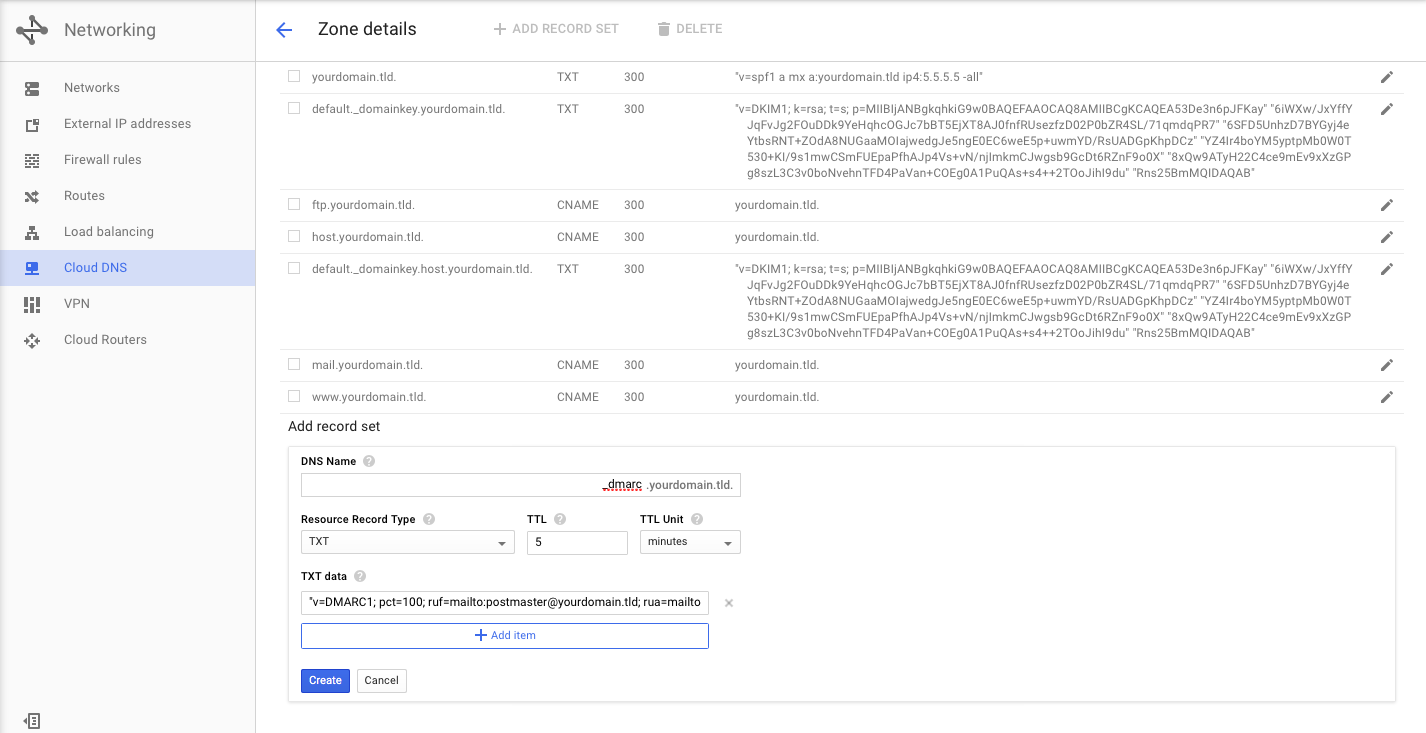
Let's now create another DNS record with type "TXT" (Google Cloud DNS has "SPF" option, but use "TXT" option). Leave the "DNS Name" field blank. Select "TXT" for type. Copy and paste SPF records from your Virtualmin DNS records for SPF as shown in the screen shot.
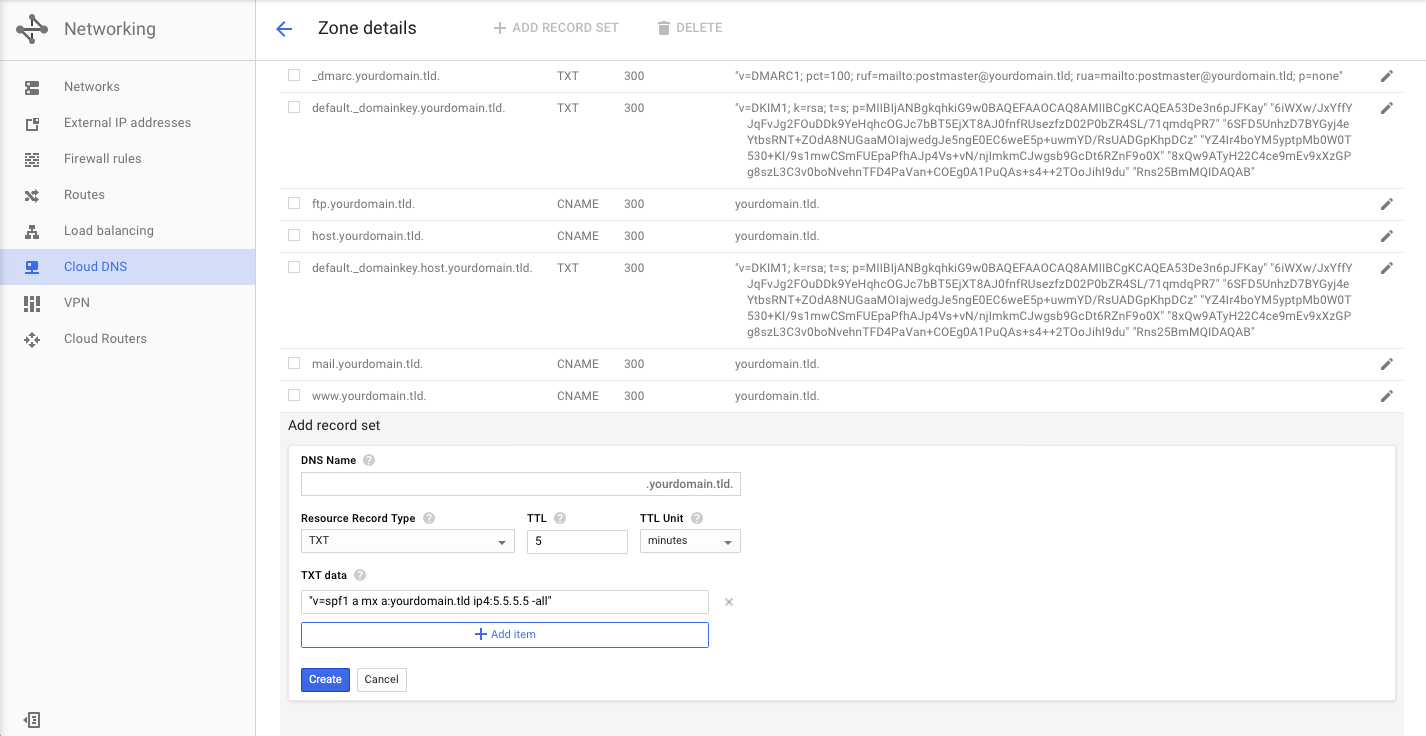
Also create another record with type "MX". Leave the "DNS Name" field blank. In the "Preference and mail server" field copy & paste or type in this format: 5 mail.yourdomain.tld.
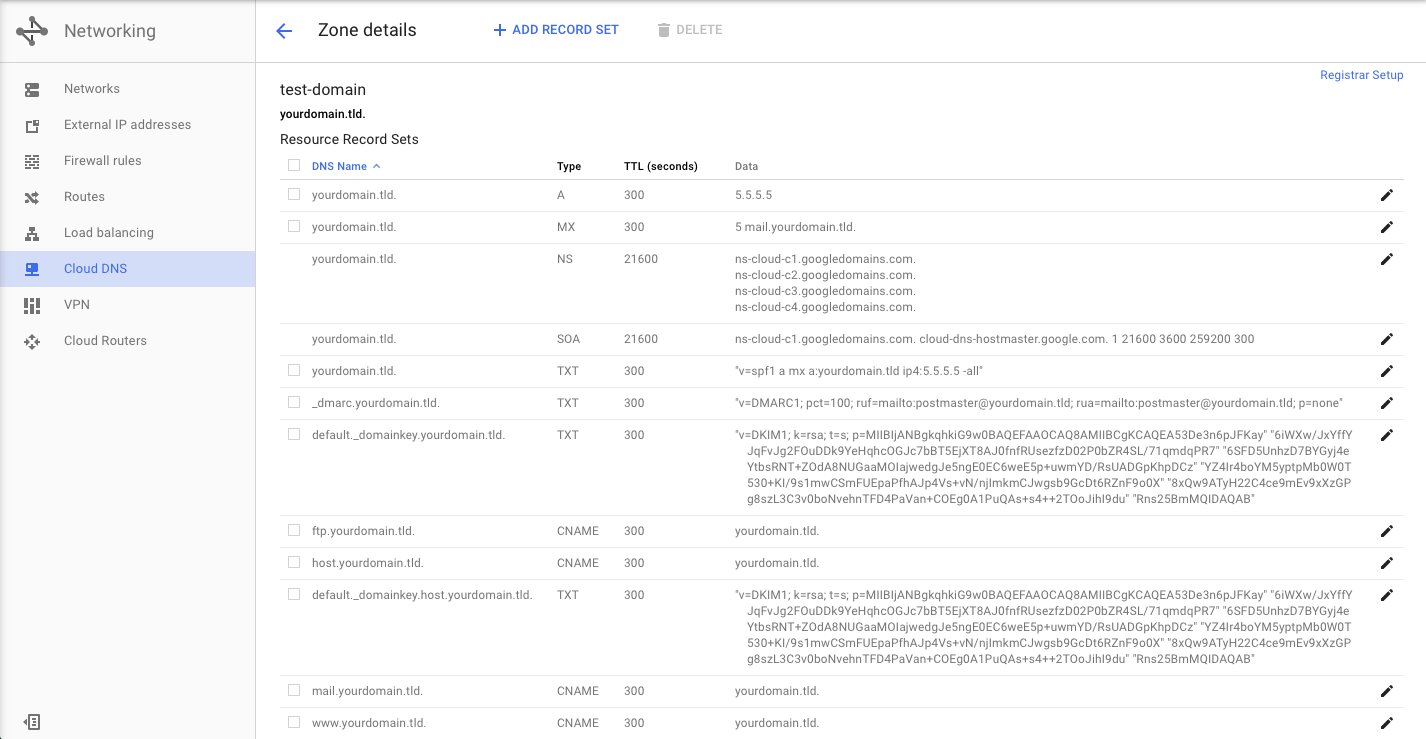
Once the above mentioned DNS entries are added, your DNS record should look like the screenshot on the right. Of course this is the starting point configuration, you may have to create more DNS records as required, especially if you are going to use Amazon Simple Email Service (SES) - recommended for both incoming and outgoing emails as your production email server. Because it can reduce your server loads and help close down port 25 to further secure your server.
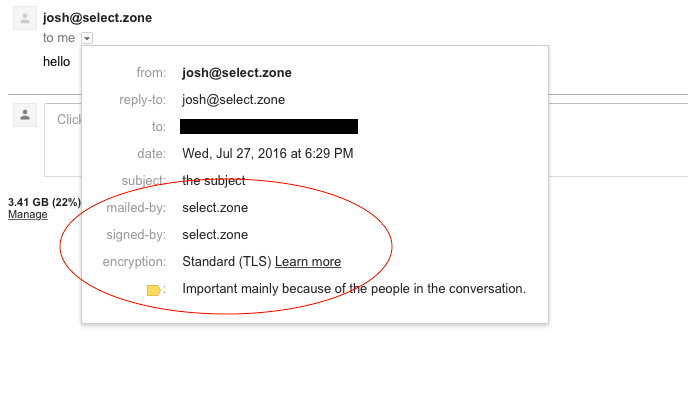
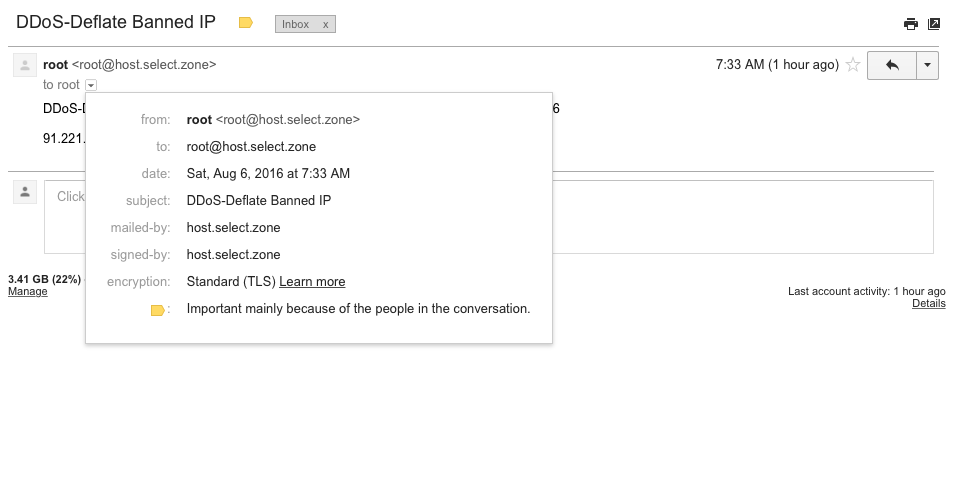
However, do not skip email & DNS configuration as it is required for proper email delivery of outgoing emails sent by PHP scripts and root emails from your server. See screenshot of an email from this AMI as received by Gmail. You'll see that the email server is properly configured to show mailed-by & signed-by information as well as the email is encrypted.
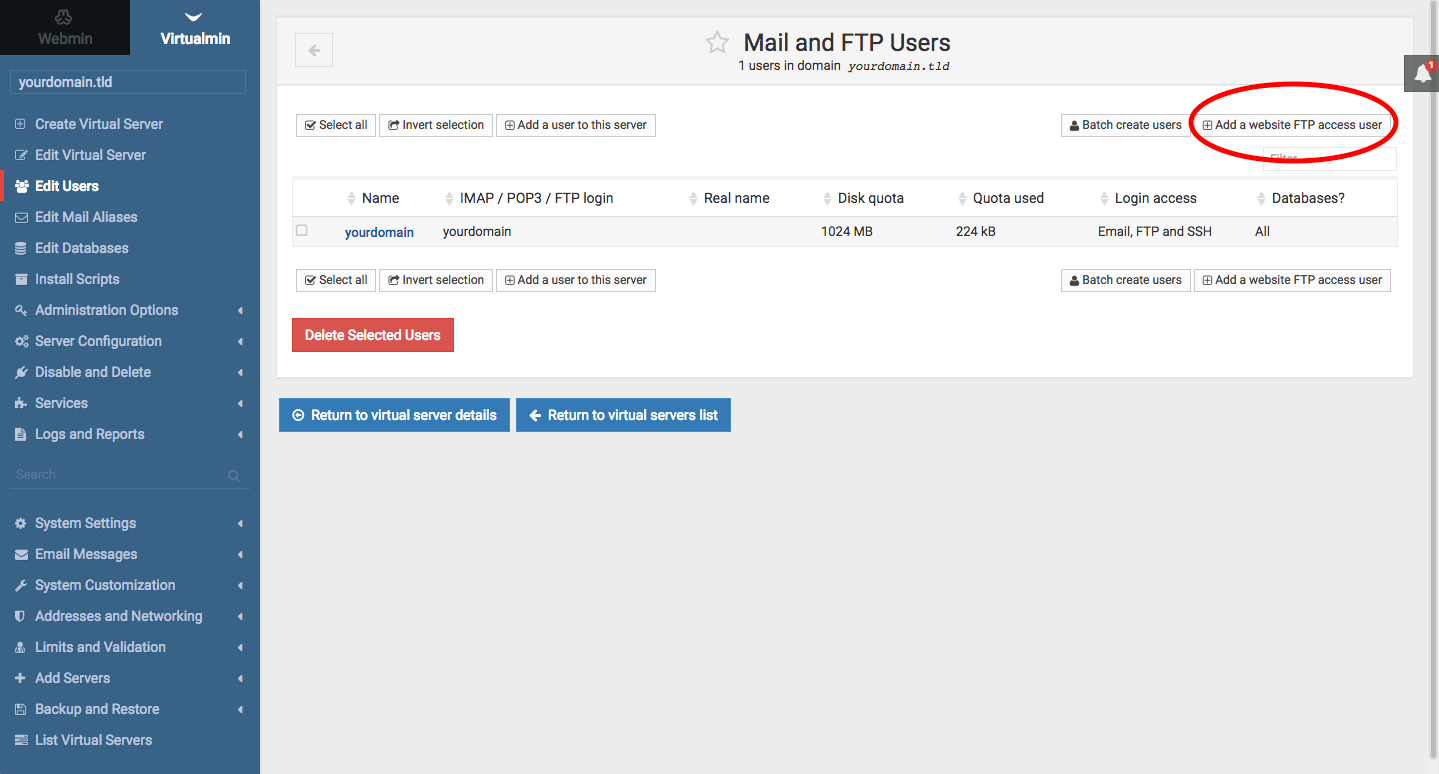
Let's create a FTP account and upload some files to your brand new website. Go to Virtualmin Tab > yourdomain.tld > Edit Users > click on "Add a website FTP access user" button (top right). On the next screen create an user as shown in the screenshot

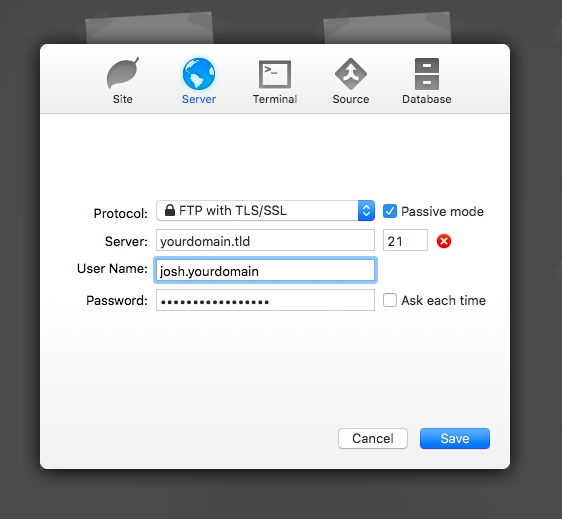
Now you should be able to FTP into your site's root folder using a compatible FTP client and upload your index.php file. See screenshot for FTP configuration. This screenshot is from "Coda", a code editor with built in FTP client. Observe how the FTP username is entered. Also, notice that "FTP with TLS/SSL" & passive mode is used as the FTP protocol option.

If you should encounter FTP access issues, try this: Go to Webmin Tab > System > Users and Groups > Scroll down and you'll see the FTP user that you just created. Click on the user and change "Shell" to "/bin/sh" and then scroll to bottom and click on "Save" button, Now try again to connect via FTP.
Go to Virtualmin Tab > yourdomain.tld > Edit Users > click on "Add a user to this server" button located towards the top left. Creating a user account from this page provides with email access for that user. You can also choose to grant FTP access. This FTP is not website root access, but acts as a storage container where the user can store files. You can also manage the user's MySQL access from this screen.
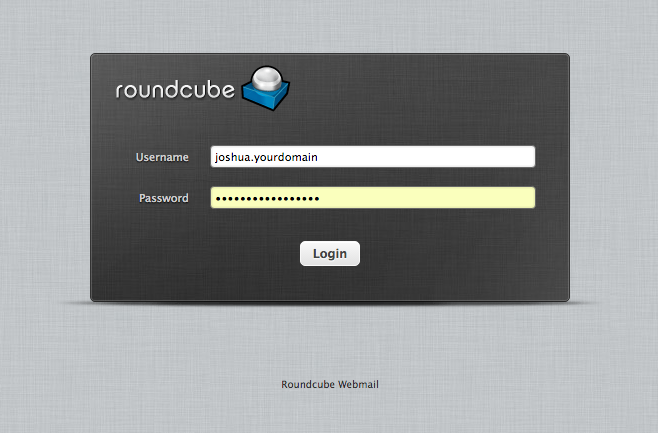
You can now install an open source email system like RoundCube from Virtualmin Tab > yourdomain.tld > Install Scripts. Email & FTP usernames always ends with your site name. Refer screenshot. You can also configure your favourite desktop email client to send and receive emails.
NOTE: Before installing open source applications, refer below to Apache Configuration > Securing Apache Access
Go to Virtualmin Tab > yourdomain.tld > Install Scripts > click on "Available Scripts" tab to see all available scripts. Free version includes about 7 scripts. Upgrade to Pro version for over 100 scripts including WordPress.
Note: Installing open source scripts to your website like yourdomain.tld/phpmyadmin/ can be a major security risk. Refer to Apache advanced setup instructions below to see how phpMyadmin and other applications can be installed in secured private directory.
If you decide to install applications like phpMyAdmin inside a private directory, while installing, make sure to edit this option "Install sub-directory under public_html", select the input box and change to "private/phpmyadmin". This will install your applications inside a directory called "private". Follow instructions below to secure this directory and everything inside it.
AWS web servers assign local ip address when instances are created. When a site (virtual server) is created via the Webmin/Virtualmin control panel, the server local IP is used in the configuration. This configuration might become an issue when you take a snapshot of this instance and launch another instance, the IP will change and the site(s) may not work.

This can be easily fixed by replacing the local IP with a * (asterisk). To do so, go to Webmin > Servers > Apache Webserver and click on "Global configuration" tab and then click on "Edit Config Files" icon. Once the configuration file loads, from the keyboard press CTRL+F or CMND+F to invoke editor search function. In the fields search for :80> and press enter key and you will see something like this: <VirtualHost 172.13.48.19:80>. Replace the IP with * to make it like: <VirtualHost *:80>. Do this step one more time for port 443 (search for :443>). Change this: <VirtualHost 172.13.48.19:443> to <VirtualHost *:443>. After the edit, click on "Save & Close" button.
When open source applications are installed, they become targets for exploitation. If your applications will only be accessed by known IP addresses, then Apache can be configured to deny access to all but those few known IP addresses.
To make it easy to configure, it is recommended to create a common directory called "private" and install all your open source applications into this directory. Also add an include file into apache directives, so that you can manage directory level access without requiring to edit the actual apache config file.
To get started, create a directory called "private" at your site root (yourdomain.tld/private/) and upload it to your server via FTP.
Create 2 files inside "private" directory called ".apache_rules.conf" and .ip_deny.rules. The contents of these 2 file will be in the following format:
# contents of .apache_rules.conf

<Directory "/home/yoursite/public_html/private">

	Include /home/yoursite/public_html/private/.ip_deny.rules

</Directory>
# contents of .ip_deny.rules

	Order deny,allow
	Allow from 127.0.0.1
	Allow from 1.2.3.4
	Allow from 3.4.5.0/24
	Allow from 5.6.0.0/16
	deny from all
As you can see, it is possible to allow IP ranges using CIDR notation or individual IP's. You can add all your IP's to this file, in the same format. Now upload these 2 files to the server.
From Webmin > Servers > Apache Webserver from "Existing virtual hosts" tab, click on your site's virtual server. You should see 2 virtual servers for each site for port 80 and for port 443 (SSL). Both needs to be edited in the same manner.
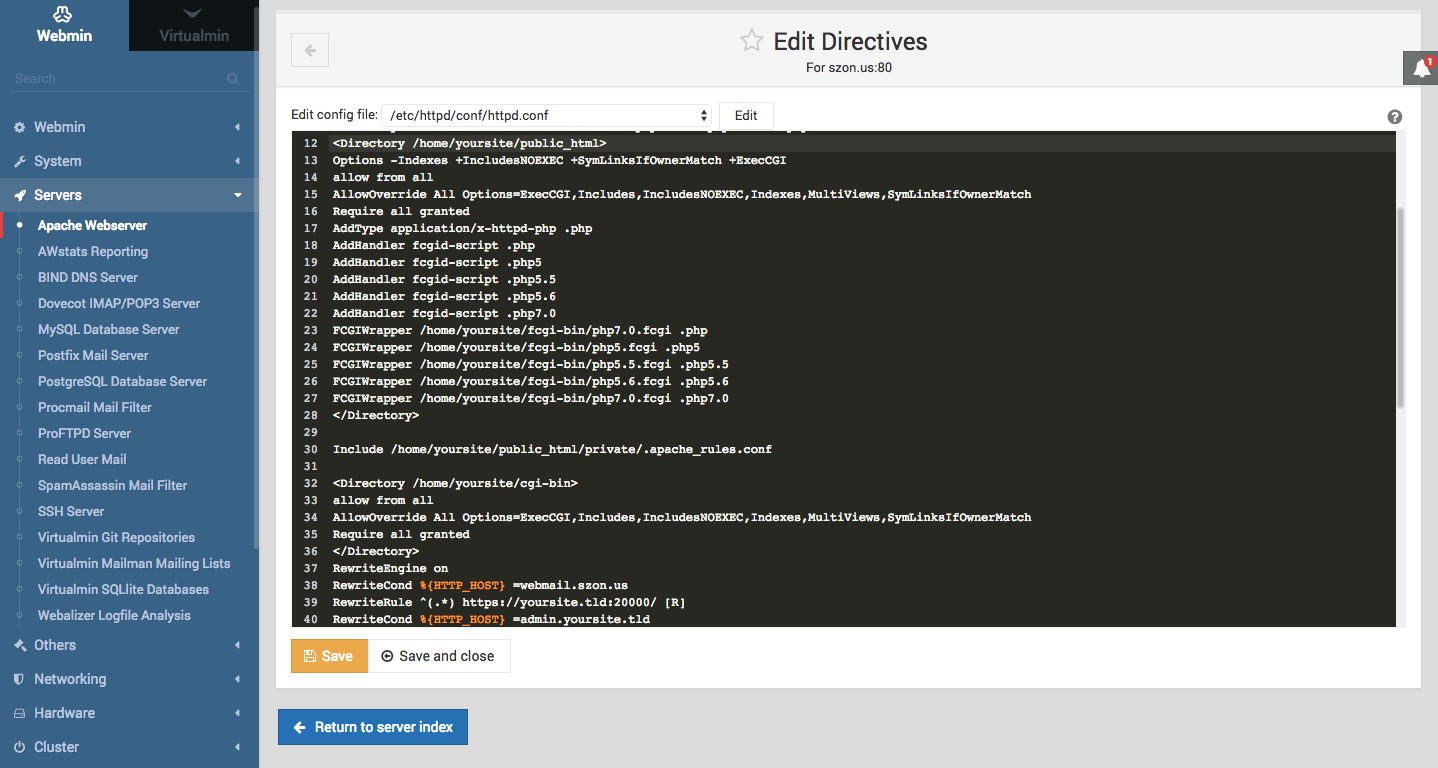
Once the "Virtual Server" is clicked you'll see "Edit Directives" icon, click on this icon to begin editing. Inside, you'll see the main "<Directory /home/yoursite/public_html>" block. Add the following code after this block as shown in the screen shot.
Include /home/yoursite/public_html/private/.apache_rules.conf
Note: replace "yoursite" with the appropriate directory name. After this click on "Save and Close" button. In the next screen restart Apache by clicking on the small refresh icon on the top right corner (when you mouse over, it'll say "Apply Changes")
Repeat this step for all your Virtual Server. You can now install all your open source applications to the private directory, knowing that it is 100% secure and far from anyone's reach!
Apache must also be restarted, each time an IP is added or removed via the include file. You can restart it from Webmin or from SSH with this command sudo systemctl restart httpd
Generally remote & dedicated database servers are employed to handle large workloads as the database doesn't have to share resources with the main web server.
However, we recommend Amazon RDS along with Elastic File System (EFS) to create a web server which is resilient to failures and future server upgrades. Since all of the site data reside remotely in Amazon RDS and EFS, switching to a new server is as easy as launching a new instance with your pre-configured AMI, once it is up and running, just switch the static IP from the old instance to the new. The site will switch over to the new instance without any downtime or the end users knowing it. Autoscaling also becomes easy as there is no need for versioning, any new instances that join the group will have the current data as the data is always served from one common / remote location. Additionally Amazon handles RDS backups and upgrades for you. If things should go wrong, you can get back up without much down time.
For small businesses or sites that are currently using MySQL or MariaDB, we recommend using MySQL with Amazon RDS. Even though, there is a slight performance gain with MariaDB, MySQL has the advantage of being able to directly convert into Amazon's Aurora DB. If your site should grow in size and traffic, MySQL will keep the upgrade choice open without adding complexity to the transition. Amazon Aurora is a good choice for both performance and cost. Aurora RDS instances are built with Multi-AZ technology (by default), if you compare server cost for a similar spec (with Multi-AZ) instance, it will generally cost almost twice with other RDS types. With Aurora, there is a direct savings in instance cost, while achieving enterprise class performance and features.
If this sounds worthwhile, follow this tutorial to setup your external RDS.
From your AWS console, goto Services & click on RDS, for here launch a new instance. For Dev/Testing select the free tier MySQL option, click next to select instance type and fill out RDS name (identifier), username and password. Click next to "Configure Advanced Settings"
Set "Publicly Accessible" to "No". If this is set to "Yes", you will then have to open incoming traffic IP by IP for the instances to communicate with RDS. If you select "No" and make this a Private RDS, then you can open incoming traffic by entering your instances "Security Group ID" to allow incoming traffic from all your instances that uses this security group. This helps when you setup autoscaling, as your instances IP's will change all the time.
Select a VPC Security Group(s) or create a new one, in the next step, you can edit this group to allow traffic from all your instances. Enter database name and launch the instance.
Now go to EC2 dashboard, from the left menu click on "Security Groups" under "Network & Security". If you have opted to create a new security group while launching RDS instance, you'll see it with group name "rds-launch-wizard". Select the RDS security group, click action button and click on "Edit inbound rules". In the window, select MYSQL/Aurora for type. Protocol is TCP. Port range is 3306. Source is custom, in the input field, start typing "sg" and it'll populate available security groups from which, select the security group used by your web server instances. This allows inbound traffic from all instance that uses the selected security group.
To make your PHP applications like WordPress to use Amazon RDS, replace "localhost" to the "Writer Endpoint" which looks like this url: rdsname.abcde123.us-east-1.rds.amazonaws.com. To obtain this url, go to RDS console, select your instance, click on "Instance Action" and then click on "See Details" to obtain "Writer Endpoint" url.
SSH into your instance and follow these commands.
$ sudo su
$ cd /home/yourdomain/public_html/phpmyadmin

# backup config file before editing
$ cp config.inc.php config.inc.php.bak

$ nano config.inc.php
# scroll to the bottom of config file and add these lines (replace RDS endpoint with yours)

// Amazon RDS Integration
$i++;
$cfg['Servers'][$i]['host']          = 'rdsname.abcde123.us-east-1.rds.amazonaws.com';
$cfg['Servers'][$i]['port']          = '3306';
$cfg['Servers'][$i]['socket']        = '';
$cfg['Servers'][$i]['connect_type']  = 'tcp';
$cfg['Servers'][$i]['extension']     = 'mysql';
$cfg['Servers'][$i]['compress']      = FALSE;
$cfg['Servers'][$i]['auth_type']     = 'cookie';
Save and exit. Now when you log into phpMyAdmin, you'll be able to log into your localhost or to Amazon RDS.
When your website begins using Amazon RDS, the server will make lots of connections to these remote resources. DDoS may ban RDS IP, if the number of connections exceed max allowed as configured in your DDoS settings. Therefore it is important to whitelist your RDS IP. To obtain your RDS IP, login to your instance via SSH terminal and run this command:
ping rdsname.abcde123.us-east-1.rds.amazonaws.com (replace with your RDS host address). This command will output RDS IP in this format:
PING rdsname.abcde123.us-east-1.rds.amazonaws.com (178.98.32.45) 56(84) bytes of data.
Press "CTRL + C" to exit ping.
Copy the resulting IP and add it to DDOS ignore list and APF allow rules.
# from terminal, edit DDOS file with this command & add IP in a new line
$ sudo nano /usr/local/ddos/ignore.ip.list

# use this command to add to APF allow rules (replace with your RDS IP)
$ sudo /usr/local/sbin/apf -a 178.98.32.45
This completes Amazon RDS setup tutorial. Contact us if you should have any questions (include your Amazon customer ID)
NOTE: This is experimental. We have received reports related to reliability issues. Do not use this instruction in production servers. This information is for educational purposes only.
Amazon Elastic File System (EFS) along with Amazon (RDS) makes your "site data" independent of the instance or web server storage making your data resilient to server failures or server migration. Basically you can add or change your web server like changing socks! This is true cloud computing!
Go to EFS control panel from AWS > Services > Elastic File System. Click on Create file system to get started. In the next screen you'll see default security group selected. You can create a new security from EC2 dashboard or you can edit the default security group to add inbound access from your instances. Click next to complete EFS creation.
Once EFS is created, go to EC2 dashboard and click on Security Group and select the security group which is used for the EFS. Then click "Action" button to Edit inbound rules. Then add the following rule: Type: NFS | Protocol: TCP | Port: 2049 | Source: Custom | in the text field begin typing "sg" and you'll see all the security groups, select the security group(s) used for your instances and save it.
From EFS dashboard, select the file system and you'll see "EC2 mount instructions" under "File system access". When you click on this option you'll see mount command with EFS DNS name. However, we have encountered "Failed to resolve server" error messages while trying to connect using DNS names. Therefore, this tutorial will cover mounting instructions using EFS IP address instead of DNS names.
Amazon EFS is replicated across all available zones. From the EFS dashboard select your EFS and you'll see all the zones along with their IP addresses. You can connect to your EFS using any one of the IP address, however to achieve best latency, it is important to connect to same zone as your instance. Additionally, to use EFS to house your site data, EFS must be mounted during boot time to be recognized by the web server & control panel (NGINX/Apache/Webmin/Virtualmin). The best way to achieve this is to mount it with a init.d script. Note: Auto mount cannot be done via /etc/fstab, since fstab is unable to run script's or commands that is required to mount EFS upon the instance's network connection is established.
SSH into your instance and run these commands
$ sudo mkdir /efs

# test mount EFS to your instance (replace IP with your EFS IP)
$ sudo mount -t nfs4 -o nfsvers=4.1 172.34.56.78:/ /efs

# create a file in your EFS
$ sudo nano /efs/mount.status

# add this content to this file, save and exit to create file mount.status
!!! Do Not Delete !!!
!!! Monit probes this file to check mount status !!!

# test if file exists
$ sudo ls -asl /efs

# if file exists, now un-mount EFS
$ sudo umount /efs

# ls again and now you should not see the file mount.status
$ sudo ls -asl /efs
If you did not encounter errors during test mounting your EFS, rest of the steps should go without issues. If you should have errors while test mounting, then the problem could be with your security group. Read the instructions above and make sure to configure the security group and grant access for your instance to connect to your EFS.
# create INIT.D script file and set permissions #
$ sudo touch /etc/init.d/efsmount
$ sudo chmod 755 /etc/init.d/efsmount
$ sudo chown root:root /etc/init.d/efsmount

# Edit init.d Script
sudo nano /etc/init.d/efsmount
In the init.d script below, replace zones (us-east-1a) and IP's (172.34.45.67) with your EFS zones and IP's. The script below has 4 zones. If you have fewer than 4 zones, delete the if ... fi code as shown below. If you have more availability zones, just add more if ... fi code blocks (as shown below) right after the first four zones.
if [ "$CURR_ZONE" == "us-east-1a" ];then
		/usr/bin/mount -t nfs4 -o nfsvers=4.1 172.34.45.67:/ /efs
fi
#!/bin/sh

# chkconfig: 235 01 01
# description: efsmount

### Usage ###
# /etc/init.d/efsmount start
# /etc/init.d/efsmount stop
# /etc/init.d/efsmount restart
# /etc/init.d/efsmount status

### Log Script Output - Uncomment for Debugging ###
#exec 3>&1 4>&2
#trap 'exec 2>&4 1>&3' 0 1 2 3
#exec 1>>/home/centos/efsmount.log 2>&1

# functions library
. /etc/init.d/functions


function mountefs {

CURR_ZONE=$(/usr/bin/curl -s http://169.254.169.254/latest/meta-data/placement/availability-zone)


#### REPLACE / ADD / DELETE ZONES AND THEIR IP ADDRESS ####

if [ "$CURR_ZONE" == "us-east-1a" ];then
		/usr/bin/mount -t nfs4 -o nfsvers=4.1 172.34.45.67:/ /efs
fi


if [ "$CURR_ZONE" == "us-east-1b" ];then
		/usr/bin/mount -t nfs4 -o nfsvers=4.1 172.34.45.67:/ /efs
fi


if [ "$CURR_ZONE" == "us-east-1c" ];then
		/usr/bin/mount -t nfs4 -o nfsvers=4.1 172.34.45.67:/ /efs
fi


if [ "$CURR_ZONE" == "us-east-1d" ];then
		/usr/bin/mount -t nfs4 -o nfsvers=4.1 172.34.45.67:/ /efs
fi


}


function loopmnt {
while :;
do
if grep -qs "/efs" /proc/mounts; then
	echo "It's mounted."
	break
else
	echo "It's not mounted."
	mountefs
fi
sleep 1
done
}

start() {
	loopmnt
}

stop() {
	 /usr/bin/umount /efs
}

restart() {
	stop
	sleep 1
	start
}

status() {
	echo $(/usr/bin/grep  "/efs" /proc/mounts)
}

case "$1" in
	start)
	start &
		;;
	stop)
	stop
		;;
	restart)
	restart
		;;
	status)
	status
		;;
	*)

	echo $"Usage: $0 {start|stop|status|restart}"
	exit 1
		;;
esac
After saving the above init.d script, run the following commands
#  reload
$ sudo systemctl daemon-reload

# start service on boot
$ sudo chkconfig --add efsmount

# set chkconfig level
$ sudo chkconfig --level 2345 efsmount on

# start script and test if it works
# if you see [FAILED] error, most likely it will get resolved after reboot
$ sudo /etc/init.d/efsmount start

# now /efs must be mounted, you should be able to see mount.status
$ ls -asl /efs
If you see the file mount.status after running the "efsmount start" command, then you have configured the auto mount script correctly. Now reboot the instance: from SSH terminal run: sudo reboot Upon reboot, run this command ls -asl /efs and if you see "mount.status" file, then the auto mount init.d script is correctly mounting your EFS during boot.
Depending on the site traffic, your server can make 100's of simultaneous connections to EFS. This may trigger DDoS to block EFS IP via APF. To prevent this, whitelist your EFS IP's. Also whitelist Amazon Meta Data IP address.
Login via SSH Terminal and perform the following commands
Using the format below, add each of your EFS IP's to APF allow list at /etc/apf/allow_hosts.rules.
# replace 172.34.45.67 with your EFS IP
$ sudo /usr/local/sbin/apf -a 172.34.45.67

# Amazon Meta Data IP
$ sudo /usr/local/sbin/apf -a 169.254.169.254
$ sudo nano /usr/local/ddos/ignore.ip.list

# add lines as follows for all EFS IP's (replace 172.34.45.67 with your EFS IP)
172.34.45.67

# Amazon Meta Data IP
169.254.169.254
CTRL + x to exit nano editor
Edit Monit config file and uncomment EFS monitoring codes to enable Monit to keep an eye on the EFS mount status.
$ sudo nano /etc/monit.d/monitrc

# uncomment these lines
 check file efsmount with path /efs/mount.status
  group system
   start program = "/etc/init.d/efsmount start"
   stop  program = "/etc/init.d/efsmount stop"
   if 5 restarts within 5 cycles then timeout


# save & exit nano; then restart monit
$ sudo systemctl restart monit
Move /home/yourdomain/public_html to /efs/www/yourdomain/public_html
# Backup site before moving

$ sudo su
$ cd /

$ cp -rp /home/yourdomain/. /home/yourdomain-backup
Depending on your site's public_html directory size and the allocated network speed, ample time may be required for the copy command to complete. Note: Smaller instance = slower network speed.
$ mkdir -p /efs/www
$ cp -rp /home/yourdomain/. /efs/www/yourdomain

$ rm -rf /home/yourdomain
$ ln -s /efs/www/yourdomain/.* /home/yourdomain/ ; ln -s /efs/www/yourdomain/* /home/yourdomain/
$ chown -h yourdomain:yourdomain /home/yourdomain/.* ; chown -h yourdomain:yourdomain /home/yourdomain/*
NOTE:
Ignore this message, while deleting site directory "rm: cannot remove ‘/home/yoursite/fcgi-bin/php5.6.fcgi’: Operation not permitted". Directory /home/yoursite/fcgi-bin/ should not be deleted. PHP will not work, if this directory is deleted and a symlink is created like other directories. If this directory is force deleted, then copy it back from remote directory using this command:From Webmin > Servers > Apache Webserver from "Existing virtual hosts" tab, click on your site's virtual server. You should see 2 virtual servers for each site for port 80 and for port 443 (SSL). Both needs to be edited in the same manner.
Once the "Virtual Server" is clicked you'll see "Edit Directives" icon, click on this icon to begin editing. Inside, you'll see the main "<Directory /home/yoursite/public_html>" (around line 12). Change this to "<Directory /efs/www/yoursite/public_html>".
# change this:
<Directory /home/yoursite/public_html>

# to this
<Directory /efs/www/yoursite/public_html>
Edit this for both port 80 & 443
-->Now your site is driven from EFS. Reboot your instance and see if the site will work as usual from EFS. If all is well, delete the backup directory that you created earlier. sudo rm -rf /home/yourdomain-backup
WordPress is the most used CMS platform today, yet there are security vulnerabilities and are a target for hackers and DDOS attackers. Archisoft takes precautionary methods to offset some of these threats by blocking direct access to vulnerable files.
It is recommended to install WordPress in its own directory like: public_html/wp1/ instead of the root directory. Another copy of WordPress (for testing) can be installed in public_html/wp2/. Going forward with this tutorial, we'll assume that you are installing the main copy of your WordPress in "wp1" directory.
Create a new MySQL User with limited privileges. Assuming phpMyAdmin has been installed, log into it with Username: root and password that was created during Webmin/Virtualmin Install Wizard (if you are using Amazon RDS use appropriate username and password).
Click on phpMyAdmin logo > Click "User accounts" tab > Add user account. Select a new user name like wp1 & password.
Check: Create database with same name and grant all privileges.
Check: Grant all privileges on wildcard name (username\_%).
Select these Privileges (or as required):
SELECT
INSERT
UPDATE
DELETE
CREATE
ALTER
INDEX
DROP
Click GO to create the new user with limited privileges.
Just like securing the "private" directory in apache configuration (above), it is possible to secure WordPress installation by denying access to wp-admin directory as well as other php files as required. In this example, we will attempt to secure most .php files from direct access. Except for php files like wp-comments-post.php, most php files does not require public access.
In "Apache Configuration" tutorial, an include file called ".apache_rules.conf" was created to customize Apache. Same file can be utilized to secure WordPress.
# adding to contents of .apache_rules.conf

<Directory "/home/yoursite/public_html/private">
	Include /home/yoursite/public_html/private/.ip_deny.rules
</Directory>


# Securing WordPress

# limit public access to WordPress root directory
<Directory "/home/yoursite/public_html/wp1">

	# deny access to php files beginning in 'wp-', xmlrpc.php and all txt files
	<FilesMatch (wp-.*\.php|xmlrpc.php|.*\.txt)$>
	    Include /home/yoursite/public_html/private/.ip_deny.rules
	</FilesMatch>


	# this is an example to allow access to specific files, edit as required
	<FilesMatch (wp-comments-post.php|canonical.php)$>
	    Order Allow,Deny
		Allow from All
		Deny from None
	</FilesMatch>

</Directory>


# limit public access to wp-includes & wp-content directories
<Directory ~ "/home/yoursite/public_html/wp1/(wp-includes|wp-content)">

	# deny access to all php and txt files
	<FilesMatch (.*\.php|.*\.txt)$>
	    Include /home/yoursite/public_html/private/.ip_deny.rules
	</FilesMatch>

	# this is an example to allow access to specific files, edit as required
	<FilesMatch (wp-comments-post.php|canonical.php)$>
	    Order Allow,Deny
		Allow from All
		Deny from None
	</FilesMatch>

</Directory>


# deny public access to wp-admin directory
<Directory "/home/yoursite/public_html/wp1/wp-admin">
	Include /home/yoursite/public_html/private/.ip_deny.rules

	# set upload limit; 0 = unlimited
	LimitRequestBody 0
</Directory>
Note: Apache must be restarted after editing configuration include files. Use this command from terminal to restart Apache server: sudo systemctl restart httpd
It is much faster to install WordPress via Terminal, as it eliminates the need to upload thousands of files to the server from your computer via FTP. Follow the steps below, change yourdomain to appropriate directory name where your site resides, as well as change wp1 to the appropriate directory name where you want to install WordPress
$ sudo su
$ cd /home/yourdomain/public_html
$ mkdir wp1 ; cd wp1

# this command can take a while for EFS installation
$ wget http://wordpress.org/latest.tar.gz ; tar xfz latest.tar.gz

$ mv wordpress/* ./ ; rmdir ./wordpress/ ; rm -f latest.tar.gz ; cd ../

# replace yourdomain with the appropriate site name
$ chown -R yourdomain:yourdomain wp1/
Download the latest copy of WordPress form https://wordpress.org/download/. Unzip it and upload its content to your server's WordPress directory using FTP. After upload is completed, configure .htaccess file as described below and then access your website from the browser to complete WordPress installation. Use the newly created MySQL user name and password credentials for this WordPress installation.
When WordPress is installed in a subdirectory like "wp1", your main site URL will also be inside a subdirectory like "yourdomain.tld/wp1". However, in Apache, you can edit the .htaccess to rewrite the URL to "yourdomain.tld". This way, it is possible to install more than 1 copy of WordPress for development and testing purposes. At any time, WordPress installations in any directory can be switched via .htaccess to make it production site.
Create a .htaccess file with the following content and upload it to the root directory of the site.
<IfModule mod_rewrite.c>
RewriteEngine on
RewriteCond %{REQUEST_FILENAME} !-f
RewriteCond %{REQUEST_FILENAME} !-d

# Replace "wp1" with appropriate WordPress directory name
RewriteCond %{REQUEST_URI} !^/wp1/
RewriteRule ^(.*)$ /wp1/$1

# Replace "yoursite.tld" with your domain name
RewriteCond %{HTTP_HOST} ^(www.)?yoursite.tld$
RewriteRule ^(/)?$ wp1/ [L]
</IfModule>
Once .htaccess is uploaded, WordPress installation can be completed by visiting your website like: www.yourdomain.tld
If you have installed WordPress from within the installation directory (prior to setting up of the .htaccess), then change site settings from WordPress dashboard. Login to the WordPress dashboard, click on Settings from left menu. Change WordPress Address (URL) and Site Address (URL) to www.yourdomain.tld instead of www.yourdomain.tld/wp1
When you enable or change "Permalink Settings" in WordPress Dashboard, WordPress creates a .htaccess file in the installation folder. This file needs to be corrected for the site to function as intended. After saving your Permalink Settings, download the .htaccess file from the installation directory and edit it as follows and upload it back to the installation directory.
Note: 2 lines requires editing:
change: RewriteBase / to RewriteBase /wp1/ and
change: RewriteRule . /index.php [L] to RewriteRule . /wp1/index.php [L]
# BEGIN WordPress

<IfModule mod_rewrite.c>
RewriteEngine On
RewriteBase /wp1/
RewriteRule ^index\.php$ - [L]
RewriteCond %{REQUEST_FILENAME} !-f
RewriteCond %{REQUEST_FILENAME} !-d
RewriteRule . /wp1/index.php [L]
</IfModule>

# END WordPress
To install large WordPress themes and plugins, increase PHP upload limits by creating a file with name ".user.ini" at wp1/wp-admin/.user.ini with the following configurations.
max_file_uploads = 32M
upload_max_filesize = 32M
post_max_size=32M
max_execution_time=120
If you manage a conventional dedicated server to operate your sites, things can get complicated if something should go wrong with the server. Downtime is unavoidable if redundancy servers are not in place (expensive options).
When Amazon instance is configured with EFS & RDS, your sites are not dependant on the server state. If the server should get corrupted for some reason, you can just launch a new instance using your pre-configured AMI and switch the IP address to the new instance and the site should resume normal operation. If you use autoscaling this will be done automatically the moment an instance should go unresponsive.
You started with the Prefect7 AMI and then created your site and configured it to your preferences. Upon completion of all your server configurations, when you think the server is ready for production, take a snapshot of the instance, which becomes your "pre-configured AMI". When you launch new instances with this AMI, all your configuration will be intact. Every time you make changes to the server configuration take another snapshot and date it or give it a version number.
From SSH login to your instance, shut down the instance with the following command: sudo shutdown now. From your Amazon EC2 dashboard, you'll see that the instance state will become "stopped". Now select the instance and click on Action button, under Image click on "Create Image". Provide appropriate name for your image and create it. Once the creation is completed, you'll see the image from the left menu under IMAGES > AMI and under ELASTIC BLOCK STORE > Snapshots.
Now you can launch a new AMI anytime using this image. While launching new instances, select "My AMI" tab to see all your saved AMI's. When new instances are launched, and if you want to move your sites static IP address from one instance to another, from left menu click on Elastic IPs under NETWORK & SECURITY. Select the IP that needs switching. Then click on Action and then click on "Associate Address". Click on the instance field and you'll see all your instances populated, select the instance and check on "Reassociation" check box and click on "Associate" button.
Congratulations on your new web server on Amazon cloud!
 Disclaimer of Warranty. This AMI is provided on an "AS IS" BASIS,

	  WITHOUT WARRANTIES OR CONDITIONS OF ANY KIND, either express or

      implied, including, without limitation, any warranties or conditions

      of TITLE, NON-INFRINGEMENT, MERCHANTABILITY, or FITNESS FOR A

      PARTICULAR PURPOSE. You are solely responsible for determining the

      appropriateness of using the AMI and assume any risks.

      Users are encouraged to do their due diligence to test all aspects

      of this AMI for stability, performance and security. Every configuration

      & server services might require further customization, tweaking and or

      patching for production.

 Limitation of Liability. In no event and under no legal theory,

      whether in tort (including negligence), contract, or otherwise,

      unless required by applicable law (such as deliberate and grossly

      negligent acts) or agreed to in writing, shall any Contributor be

      liable to You for damages, including any direct, indirect, special,

      incidental, or consequential damages of any character arising as a

      result of this License or out of the use or inability to use the

      Work (including but not limited to damages for loss of goodwill,

      work stoppage, computer failure or malfunction, or any and all

      other commercial damages or losses), even if such Contributor

      has been advised of the possibility of such damages.
